Friday, January 30, 2009

A short history of my woodworking projects, part 2

We're quickly coming to a close on my woodworking career.

After I moved out of the apartment, my woodworking stuff was packed away for quite a while until we could build our house. Once it was built and we moved in, getting my workshop in shape was not the highest priority, but I eventually got it set up as described in my earlier post.

I no sooner had it set up and started to work on a possible tool chest, and my wife became pregnant. We had a very "interesting" pregnancy which ended up turning out well, but we had a healthy premature baby to visit in the hospital for 6 weeks and then take care of for quite a while longer. Basically, I didn't get diddly squat done for a couple of years.

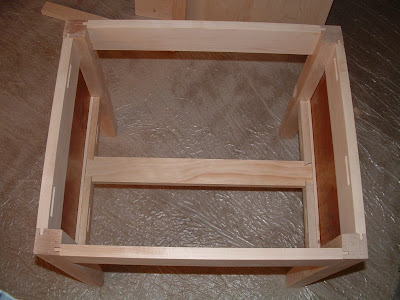
Then we needed a step stool for our son to be able to reach the sink. Sure, I thought, that would be an easy one. I took the old glued up panels I had made out of borg poplar and cut them down to make the sides and treads of the step stool.


The hardest part was getting the sides cut down even and straight. If I had started out and glued up the sides from scratch it would have been much, much easier. I dovetailed the treads in and stuck a cross post in at the bottom of the front to keep it from spreading.


And that's dovetailed into the sides as well. It was dovetail practice time.


I was rusty, but it turned out pretty good. It's a little high for its footprint so can be a little tippy if you're not careful, but I could now build another one in half the time.

With one more project success under my belt I convinced my wife that we needed a bookshelf in the kitchen for the cook books. I went a little crazy in the lumber store and decided to make it out of 4/4 curly maple.


It's a pretty simple design, and I had to make it to definite dimensions so that it fit in a specific place, but I still managed to screw it up a bit. I cut the last shelf just 1/2" too short, and since my wood stretcher isn't working these days, I had to go buy one more board for the last shelf. Very frustrating.

But it also turned out ok. I did wedged tenons to hold the bottom shelf to the sides. I did have some measurement challenges and ended up making the top shelf too short for anything but my son's kid books and a couple of other odds and ends.

<


But the wood is beautiful (Danish oil and wax finish) and the dovetails in the 4/4 material turned out pretty good as well. Overall I'm happy with it despite the few mistakes I know I made.


So, that brings us to the present day. With this incredibly extensive resume of woodworking projects, I decided that I was ready to tackle a new challenge. I got Christopher Schwarz's workbench book and fell totally in love with the Roubo bench. With no real fear, or enough sense to know any limitations, I decided to go for it. But that's another, and longer story, that's still going on. I'll start that in my next post.

AAAndrew

A short history of my woodworking projects, part 1

I haven't actually created that much as far as furniture goes. I thought I'd throw out at least a record of what I have done.

When I first became interested in woodworking I took two classes: Introduction to Hand Tools, and Hand Cut Joinery. Both were good classes, but just one evening introduction classes. After the joinery class I wanted to practice the joints and didn't want to spend much money on materials so I used some of that mysterious splinter wood from Sweden they call "pine." I made a modest hanging cabinet which was basically a box with a couple of shelves and a drawer. It was originally going to have a second drawer above the one it has, but I never got around to it.


Right above the cabinet you can see another project of mine, and the only tool I've made, a bow-saw. The saw was relatively easy to make and would work well, except I need to get a better blade, and I need better string so that I can tension it more. I should try it again since my sawing skills have improved since the last time I tried it. Maybe it wasn't the blade, but was me. It's possible. LOL

I then moved here and set up my apartment workshop (see my earlier post) and made my tv table. This was quite a project. I was very naive going into it. I used hard maple as the wood. (stupid!) I had no conception of how to select wood for faces and insides, nor how to really dimension wood with hand tools. But nevertheless, it turned out extremely sturdy and pretty good for a first piece.


I bought the lumber rough sawn and dimensioned it myself. I did a great deal of it with just a scrub plane. Despite having a great old German scrub plane, it was a lot like work.


You can see the great grooves left by the scrub plane.


After a while I decided to try rip sawing the 1/4" of wood I needed to take off of the legs.


That was also a great deal like work, but not as much as the scrub plane. Between the two I managed to get the job done.

I also used some great new tools I had managed to buy including a Steve Knight razee jack plane which was so sharp and well tuned that I was taking end-grain curls off the hard maple.


And a Steve Knight razee jointer plane which is also a very nice plane.


I had made bottom rails spanning the legs to support a lower shelf in such a way as I couldn't get the shelf in, so I ended up cutting the rails off (thus leaving the tenons still in the legs), and dovetailing in a center support. I now know it's not really needed, but I doubt I'm the first person to over-engineer my first piece.


I attached the top and shelf with wooden buttons, thus using the only screws in the whole piece, finished it with dyed shellac and it's all held together pretty well for 5 years.


You can see that my tenon shoulders are not quite straight and so there's a bit of a gap, but because I had made my haunched tenons a little long, they've held quite well. Overall I hand cut 16 mortise and tenon joints (24 if you count the wooden buttons which are sort of mortise and tenons) and made two frame and panel constructions. I jointed and glued up two surfaces with no gaps, and all in hard maple with no design but my own ideas, and all with hand tools. I'm pretty proud of this for my first try at furniture.

More in my next post.

AAAndrew

Introduction to my shop.

We'll start with my crowded little shop. It's in a spare bedroom. I took up the carpet and put down a plastic engineered floor which makes it very easy to sweep up the shavings and dust.

My first "shop" was the basement of our house in Michigan. I don't have a picture of that, but it was pretty typical for a basement workshop. Lot's of room, not much glamor.

My second shop was in a two-bedroom apartment I rented when we moved to our current location. My wife stayed behind for some months and so I brought my tools and workbench and set up shop.


My current shop is the aforesaid bedroom.


My meager supply of tools didn't make much of a dent in the room when I first moved in.


But I got them set up and it is pretty cozy. Here's when it was new and neat:


My solid-core door and construction lumber workbench


Here it is today:


I also have a "step-in" (not as big as a walk-in) closet where I store my clamps, and some true walk-in attic space that's mainly filled up with house-hold stuff, but there's some room for seasoning wood.

Well, that's about it. I make do and get a lot done. It's climate controlled, which makes up for a great deal. I'd rather have a climate-controlled small workshop than a massive one that alternates from freezing in the winter to boiling in the summer. But that's me.

The only power tools in my workshop are the lights and a CD/Radio I use to listen to Jane Austin books on tape while I woodwork. I'm weird that way.

Next I'll start a quick review of some recent projects, then I'll start on my current project, a Roubo-style workbench based on Chris Schwarz's version.

AAAndrew

Purpose of the Blog

Every blog should start with some kind of mission statement. I don't mean some corporate speak gobbeltygook full of buzzwords meaning nothing. But I believe in having some focus, some reason to exist. I've tried the "whatever I feel like writing about" blog and that lasted about four entries.

This blog is a bit more narrowly focused, and is really meant just for me. It is where I shall record the (very slow) progress of my woodworking projects.

The name, Incidental Woodworker is appropriate as "incidental" means:
  • (sometimes followed by `to') minor or casual or subordinate in significance or nature or occurring as a chance concomitant or consequence ...
  • incidental expense: (frequently plural) an expense not budgeted or not specified; "he requested reimbursement of $7 for incidental expenses"
  • not of prime or central importance; "nonessential to the integral meanings of poetry"- Pubs.MLA
My woodworking fits this definition well. I get only a few hours a week, when I'm lucky, to work in my shop. Recently, though, I have been having the desire to create a record of what I'm doing, and how I'm doing it to try and remember what I did to solve certain problems. It's also nice to remember all of the mistakes I made and what I learned from them.

So, this blog is really for me as an aide memoire for my woodworking experience. It won't be a daily thing, nor will it be terribly interesting, I suspect, for anyone else. But, I will assume I'm writing this for an outside, and interested, spectator who cares as much as I do about what I've done. In other words, it's for my future, senile self who can't remember what I did, but would like to remember.

Here's to you, future self. Hope you're having a good time regardless of the memory loss.

AAAndrew