Monday, March 23, 2009

Let the flattening continue!

Ok, so not the most inspired title.

I got another hour in the shop yesterday morning (nice light in my workshop in the morning). I pulled out my winding sticks (nice little aluminum jobs from Lee Valley) and checked my bench. I was quite pleasantly surprised to find that except for a tiny bit of crown in the middle of the bench in one place, it's pretty darned flat and true. Or, I'm just lousy at figuring this stuff out. (always a possibility).

I began the day with the bench looking like this.


Because I use my foreplane for light jointing work, I've never really put a curve in the blade or relieved the corners enough. I think that's something on my list of things to do, next time I sharpen. You can see the places where the edges of the blade dig in on my traversing strokes. It's not a huge deal, as I'm not too worried about finish of the top, I'm more concerned with flat and true. (there's one board in particular where I keep getting tearout going crossways, but it's not really worrying me like it would if this was fine furniture I was building)

The next step was to go down the top again, still traversing, with a more finely set jointer plane. I got out one of my favorites, an old "B" (Birmingham) plane. This is such a nice plane. It's about the size of a #7 and has always done a great job.

I worked my way down the top making sure I overlapped my courses. I found that sometimes I'd get to one area and the plane would hardly bite at all. For those areas I'd either work in from the right (I was going right to left down the bench) more slowly, taking more overlapping passes, or work in from the left going backwards, and eventually I'd be taking the full-width passes I was looking for. Again, this can be a whole lot more work than you want if you don't wax the sole of the plane. I use an old candle. It works.

Here's a picture part way down. You can kind of see how much rougher the surface is below the plane than above it. There are still marks from the jointer plane to be see, but that comes next. Overall, it's a much smoother surface. (and, yes, that's the tearout I'm talking about)


The next step, and the last I was able to do yesterday, was to then start to go down the bench at an angle. I got out my foreplane again and started up at the corner and worked my way down the bench. Again, I made sure I was getting full-width cuts that overlapped. You can see that the shavings are a bit different. You can get longer, ribbon-like shavings at this point. What's interesting is that the raking light really makes the bench look much more textured than you can feel. It feels quite smooth at this point, but the light shows up the texture better.


After this I checked again with my winding sticks and things are looking quite good. Next time I'll start going down the top with my jointer to take out the ripples.

Saturday, March 21, 2009

Let the flattening begin!

So, I've got the basic shape together. It's now time to turn this table into a bench.

The first thing is to get the top flat. No matter how precisely you glue up, (at least no matter how precisely I glue up), there will always be boards slightly out of alignment, or some that are bowed and so stick up higher than ones around it. The first step is take all that down to relatively flat, and the fastest way is to plane across the boards, also called traversing. I got through traversing my bench today.

First thing was to sharpen up the blades of a couple of fore planes I have. I haven't used them in quite a while, so I made sure they were nice and sharp. I ended up choosing my recent stanley #6C with a Hock replacement blade. I like to use my #6 for this as it works like a mondo jack plane with more weight behind it, and more length. It's not quite a jointer, but more than a jack. It's all personal preference. I also like to cut dovetails with a larger tenon saw. Go figure.

I first pulled this plane out the night I got this all together and tried a few swipes across.

<

It was a chore. Now, I don't expect this to be a walk in the park, but it was harder than I thought it should be, which told me I needed to sharpen. That's what I did, and did a bunch of other blades from my long planes (fore and jointer), and my little German scrub plane at the same time.

Next time I tried it, which was this afternoon, it was a whole other story. I was able to take off huge strips of wood, including full-width shavings of cross-grain hard maple that stayed together across several boards. You can see the very specific type of shavings you get from this kind of work.


You can see my little German scrib plane in the background. I tried it out, but it's blade is so small, really meant for taking down the edges of boards, not faces, and I could get much bigger cuts, and thus faster, from my #6 plane.


Here's a closer look at the scrub plane.


And there were a LOT of cuts to be made.


Overall, very satisfying. Next step will be to check for wind with my winding sticks and look for high spots. Then I'll start to transverse again, this time with a finer-set jointer, then I'll start to go down the bench with a even-more-finely-set-jointer, taking out high spots, etc... before finishing with a smoother. I'll probably wait on the smoother until the end. I at least wanted to get the bench pretty flat before fitting the face vise, and yet want to wait on the final smoothing until I've finished everything else. Then I'll do final smooth and decide on any finishing I want to do.

Still a ways to go.

One note, though, that came about during my sharpening, was how impressed I was with the Peugeot Frers. iron in the scrub plane. It is a nice, solid chunk of iron, and that thing sharpened up beautifully, and honed to a mirror finish. You don't need a scrub iron to be that honed sharp, but I put a higher angle on it, 35-degree, and didn't mind spending a tiny bit more time to get it really shining. It's one of the nicest irons I have.

The logo


The blade with the original sharpening profile. I've tried to keep the interesting profile, but I've just sharpened it. This picture is a "before" picture.


AAAndrew

Tuesday, March 17, 2009

Pictures of the Process, Part 4

What a way to end a weekend of intense work. Yesterday I ran over to Woodcraft and got some little pinpoint gluers. I also called Titebond (Franklin) and talked to one of their good technical service people. He told me that Titebond III, which I had used for the initial glueup, does glue to itself, so his recommendation was to use the same glue.

I spread the joint a little bit with my beater glueing chisel (a modern, plastic-handled chisel I use for nasty jobs like cleaning up dried glue), drilled a few 3/32" holes into the joint from the back of the bench top, and proceeded to use the pinpoint gluers, which are long, thin metal tips attached to a little accordion-style glue bottle, to apply LOTS more glue. I squirted as much as I could into the drill holes, and then up at the end block for the wagon vise, I just came at it from every angle and was able to get the metal tips all the way into the joint and just flood it with glue.

Here's the split. The far right board on the edge is board 1, then you have board two and then three as you move into the top. The split was between board one and two below the wagon vise, and the between three and four at the end block for the wagon vise.


Arrrgh!

In the end I glued it up and put the clamps on and let it sit for about 12 hours. (yes, I did this first thing in the morning)


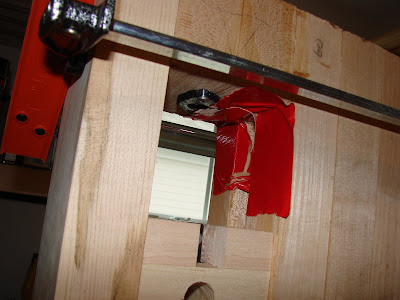
I was also very worried about glue squeeze out running into the wagon vise, so I taped over the gap with duct tape, which happens to be red, don't ask. This seems to have worked pretty good. There was squeeze out but the duct tape held it back enough that what little got through was easy enough to scrape off. My main worry was that I'd glue my vise chop into place!


Now that the crisis has been covered, let's go back and see what lead up to it. And you'll see how much work went into the top that morning, which made it all the more heartbreaking when the split happened. But I guess better now than when I went to clamp the first board in the wagon vise.

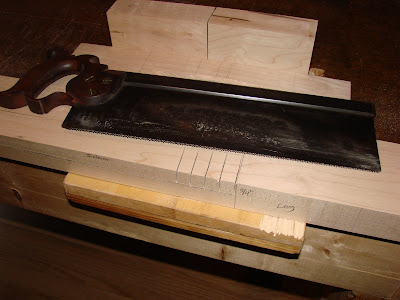
First thing I did that morning was to cut the ends off of the top. I used my c. 1917-1940 Disston D8 cut to 8tpi. It is a real trooper of a saw.


I had to get up on top of the bench to start the cut. I wanted to see the cut clearly. If I had more than one saw bench (yeah, yeah, I know) then I could have tried to haul the giant slab o' wood onto those, but this worked as well.
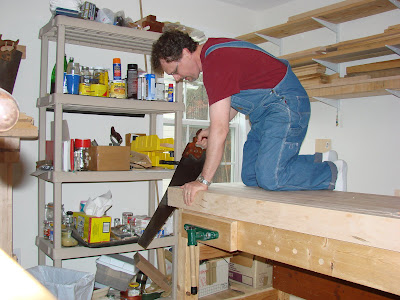


Starting the cut


Keeping to the line pretty well, at least from this angle.


You can see up where the cut started, just past the fourth board, and back at the corner where I cut a relieving cut so it didn't splinter out at the end, I actually cut a little out of perpendicular to the top. I'll be focusing on that when I break out my end grain planing operation.


I tried starting the cut from the floor when I did the other side and tried to keep it straighter up and down. I found the first four boards actually made this more difficult in the end. As you can see, I also flipped the bench to be able to saw this side right-handed. You can see the long slot for the sliding deadman down the front of the bench.


The next big operation was to cut the giant mortises into the top to fit the tenons on the ends of the legs. I tried all kinds of things, including a couple of big t-augers I have. I'll tell ya', that hard maple is more than a match for any of that stuff. I ended up, as I mentioned in my earlier post, drilling lots of smaller (1/2") holes around the perimeter of the mortise and then chopping out the rest of it. I did try on one mortise just boring out holes on just one end to give some relief and then chopping out the rest with my big mortise chisel. That ended up being a whole lot of work, which chips flying everywhere in the shop.


loved this little curl spit out by the bit.


Next time (ha!), I will make sure there is sufficient space between the end of the wagon vise and the mortise for the leg. As you can see the wall between the two is very thin and it blue out a little bit. I don't think it really hurts the integrity of the top, but I would have felt better with more wood between the two gaps.

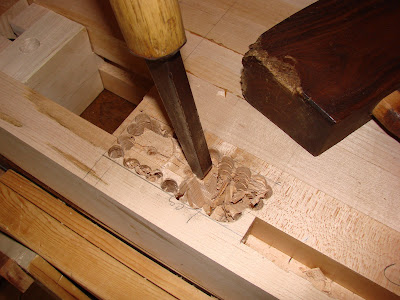


These mortises are two-inches deep, two inches wide and five inches long. That's a lot of wood to take out.


This is when I finally figured out the best way to do this, and of course it was the last one. You can see the big chunk I was able to pop out. You can also see the drip of sweat on the wood. Between sawing and these mortises, I definitely got my workout for the day!


Once I got all the mortises cut, I went to fit the base to the top. I first put a bevel on the tops of the tenons to help ease them into the mortises.


I fiddled a bit and got the tenons in pretty tightly but couldn't quite make them go in all the way. This is when I flipped the bench onto the floor. (that was an adventure!)


And it was while I was trying to pound the tenons into place that the split happened. All of which I covered above. After all that work, you can see why when the top split I just put my tools down and walked away for the rest of the night. I had put in a good 8+ hours in the shop of hard work and I was tired, discouraged, hungry, sore and ready to stop.

While the split was drying (the next day), I glued up the boards for the leg vise chop. I also was reminded why I have a love/hate relationship with my Jorgenson clamps.


I planed out a little spring into the boards, put plenty of glue on and clamped them in. Or at least I thought I had. When I went back to take it out of the clamps I discovered that I hadn't actually tightened the middle clamp or the one on the end. They felt tight because I hadn't tilted the handles correctly and just tightened away until the handle wouldn't move any more. It wasn't tightened, it was just screwed all the way back while still in loose sliding mode. It's hard to describe, but if you have clamps like these you know what I'm talking about. So, I ended up with a nice little gap right down the middle of the boards where the spring was. AAAARRRGGGHH!!

So, after doing this again (I did have spares this time!) I got it right. One of the boards is a 1/16" out of true in the middle, it's a bit bent, but that I can deal with on a 7/4 thick board.


At that point I started to make my dinner. I felt I deserved a bit of a treat for all the hard work so I made myself a Bacon Explosion. (Look it up) It's basically a woven mat of bacon, stuffed with Italian sausage with cooked bacon in the middle. It's then slow cooked and eaten in slices. It's like smokey, spicy meatloaf, and quite good. I used a Caribbean rub instead of the BBQ sauce.


After my late, but very delicious, dinner, I went back up to the shop and very carefully fitted the tenons into the mortises. I never forced anything, and ended up cleaning out one of the mortises a little more, and taking some off of the tenons where it was rubbing, etc... In other words, all the stuff I should have done the first time. This time was a little easier because I had the top down on the floor sitting on four wooden blocks so I could get my fingers underneath it to lift it when I needed to. (Good idea!!) And in the end, Voila!


Here's the underside of the wagon vise. You can see the blow out of the thin wall between the mortise and the wagon vise on the left, and the squeeze out of the glue from the re-glue of the end block on the right. Not so pretty, but damn it, it works!


I couldn't resist getting out my #6 with a Hock iron and taking some cross passes on the bench. Sweet! It is going to flatten out nicely, and will be another source of a good workout.


AAAndrew

Monday, March 16, 2009

The fun for the night

Today was a long day. I sawed off the ends of the top, and didn't do too badly considering I was using a Disston D8. A lot of work.

I then flipped the top and laid out and cut the massive mortises into the top for the legs. These things are 5"x2" by 2" deep. That's a lot of hard maple to cut out. I tried all kinds of things, and finally figured out the best combination on the last mortise. I bored holes around the edge of the mortise with my brace and bit and then cut out the middle with my, now indispensable, 1/2" Butcher mortise chisel. That was even more work than the sawing!

I got the base, somehow, up on the bench where the top was upside down. I fitted, and fettled the mortises (I thought) so that they fit the tenons in the legs. I then began to pound them in. The legs got stuck and wouldn't go further in, or come out.

Risking my life, I very carefully flipped the bench off of my old bench and onto the floor. That was scary, but it all came down fine. I then began to whack at the top (with suitable sacrificial boards to protect it). It all seemed like I was making very slow progress, which should have told me to stop, and work even harder to separate the two pieces and re-look at the tenons. Instead, through being tired, sore, hungry and anxious to see it together, I kept pounding. Eventually, I had the inevitable tragedy. I started to split the front boards. The split is along the glue line where I believe I had too little glue in the initial set I glued up.

At this point, I put down my tools, turned off the radio, turned off the light and left. I ate dinner, watched a movie and then went back up and very carefully, with a couple of my big vises turned into spreaders, separated the base from the top.

Now I'm trying to figure out how to fix the split. I've written to the old tools list as well as Titebond to ask what they suggest. The split is in two places: one whole face of the vise end block (between 3 and 4) , which is the most serious place to have a separation, and about six inches down from the vise opening along the joint between boards 1 and 2. My concern is that I find a glue that will work with the glue-coated faces of the boards, and that I can inject into the crack. I'm thinking epoxy at the moment, we'll see what we hear from Titebond.

Other than the crack, the bench looked really cool finally put together. I can't wait to fix this and begin making the leg vise.

Oh, yeah, I've already trimmed the tenons a little bit. I won't be doing the same thing again.

AAAndrew

Sunday, March 15, 2009

Pictures of the Process, Part 3

Alright. I have the wagon vise finally worked out! That was a big source of trouble and headache, mainly because I was trying to figure out how to do it on my own. In the end, it's a pretty simple concept, but the execution was a bit more challenging. I'm sure I made it much harder than it needed to be, but it was also a learning experience for me. So glad that's over!

Now onto something a lot more straight forward. I need to cut a groove into the bottom of the first rail to accept the top of the sliding deadman. I decided to cut the groove now, before glueing up the boards since I had already had experience with the fun of cutting a long groove in this wood by hand.

My boards for the top are 7/4 thick. The boards for my sliding deadman are 4/4. So the question becomes, where to put the groove? One consideration is that I'm seriously considering making, in addition to the sliding deadman, a sliding leg vise to go into that slot. I've seen a couple out there on other web sites and to me, it gives me the benefits of an adjustable double screw face vise while also allowing me the flexibility of two independent screws without having to worry about racking, and yet still able to have the deadman for everyday work.

But that's for the future. With this in mind, though, I decide to build the slot deeper into the front board to allow for the pressures that a sliding leg vise exert. I end up putting the groove one-inch in from the front and make it 3/4" wide. I also make it 1 1/2" deep. For my sliding deadman I will attached a piece of 3/4 board to the back of the deadman that will slide in the slot.

So, now for the layout. I get it laid out and start cutting a series of relieving cuts similar to how you cut for half-blind dovetails.


I get all the way to the end and stand up the board. That's when I realize that I've laid out and cut the cuts on the OUTSIDE face of the front board. After a short, therapeutic spell of exclamations and verbal ejaculations, I get out the last spare board I have and carefully, very carefully lay out exactly what I'm going to cut and where. This is where I come up with my daily lessons in the earlier post.

I cut the damned groove one more time, and cut the relieving cuts for the deadman slot again, this time on the inside face of the board. Notice the very explicit markup on the board.


I begin to take out the waste using my wonderful Butcher pigsticker again, as well as some other finer chisels for clean up. There was a reason for this piece to be my final backup. The grain on it goes every which way and there are streaks of discoloration all through it. I don't mind the discoloration, but the wild grain made it an extra pain to cut out this waste.


Finely, I had everything ready and I did a dry run clamp up without glue. Amazingly enough, it all fit together and began to look like a workbench.

I took the leap and glued up the first four rows of boards together. I did these as one piece because of all of the fiddly bits of the wagon vise and the opening for the planing stop at the other end.


At this point I took a break and went next door for a St. Paddy's day open house. I was temperance itself (relatively) and only had one hard cider with my corned beef and cabbage because I was anxious to get back and finish up.

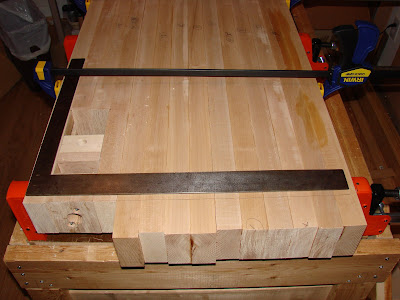
I came back and began adding pieces. You can see that boards 5-14 were purposely left a bit long, as I mentioned in earlier posts. Today I will get to trim that off. In the first picture you can see the opening for the planing stop near the other end. I did trim that just a bit to make sure it was square before continuing the glue up.


In this next picture you see my little glue pot. I'm not sure where I picked it up, but it's got a big ol' brush built into the lid which is perfect for these massive glue up situations. It really lays down the glue thickly enough and yet the brush allows me to spread it round quickly and evenly. I've tried those little acid brushes, which work ok for small parts, and old credit cards (or hotel key cards) for spreading glue, but nothing works as well as this little modest glue pot for large glue jobs.


I worked my way along, sometimes adding two at a time, sometimes just one. I took my time and eventually made it all the way to 14!!


As I mentioned a couple of posts ago, I've laid out the lines to trim to using a very old carpenter's square I have. It's still square and works perfectly for this operation.


You can see here how I numbered each board. Some eventually got shifted around, as you can see by the cross outs. I wasn't too worried about pencil marks on the top as I'm going to have to flatten the top anyway and will take off the marks then. The numbers actually served a couple of purposes. It helped me keep my boards in some kind of order, and also they indicated grain direction. If I placed the board with the number right-side-up from where I stood, then the grain all runs in the same direction. This way, when I go to smooth the top I can plan from right to left and, as much as possible, the grain will cooperate.


Well, that's it for now. Today I trim the ends of the top, and try to flip it and cut the mortises for the leg tenons. I will then attempt to affix the base to the top, and get my big, strong nephew to come over and help me flip it and put it down on the ground. At that point I'll probably have to shift my workshop around to accommodate two benches while I make the leg vise.

Wish me luck!

AAAndrew