
Today was a long day. I sawed off the ends of the top, and didn't do too badly considering I was using a Disston D8. A lot of work.
I then flipped the top and laid out and cut the massive mortises into the top for the legs. These things are 5"x2" by 2" deep. That's a lot of hard maple to cut out. I tried all kinds of things, and finally figured out the best combination on the last mortise. I bored holes around the edge of the mortise with my brace and bit and then cut out the middle with my, now indispensable, 1/2" Butcher mortise chisel. That was even more work than the sawing!
I got the base, somehow, up on the bench where the top was upside down. I fitted, and fettled the mortises (I thought) so that they fit the tenons in the legs. I then began to pound them in. The legs got stuck and wouldn't go further in, or come out.
Risking my life, I very carefully flipped the bench off of my old bench and onto the floor. That was scary, but it all came down fine. I then began to whack at the top (with suitable sacrificial boards to protect it). It all seemed like I was making very slow progress, which should have told me to stop, and work even harder to separate the two pieces and re-look at the tenons. Instead, through being tired, sore, hungry and anxious to see it together, I kept pounding. Eventually, I had the inevitable tragedy. I started to split the front boards. The split is along the glue line where I believe I had too little glue in the initial set I glued up.
At this point, I put down my tools, turned off the radio, turned off the light and left. I ate dinner, watched a movie and then went back up and very carefully, with a couple of my big vises turned into spreaders, separated the base from the top.
Now I'm trying to figure out how to fix the split. I've written to the old tools list as well as Titebond to ask what they suggest. The split is in two places: one whole face of the vise end block (between 3 and 4) , which is the most serious place to have a separation, and about six inches down from the vise opening along the joint between boards 1 and 2. My concern is that I find a glue that will work with the glue-coated faces of the boards, and that I can inject into the crack. I'm thinking epoxy at the moment, we'll see what we hear from Titebond.
Other than the crack, the bench looked really cool finally put together. I can't wait to fix this and begin making the leg vise.
Oh, yeah, I've already trimmed the tenons a little bit. I won't be doing the same thing again.
AAAndrew
Showing posts with label failure. Show all posts
Showing posts with label failure. Show all posts
Monday, March 16, 2009

Sunday, March 15, 2009
Pictures of the Process, Part 3
Alright. I have the wagon vise finally worked out! That was a big source of trouble and headache, mainly because I was trying to figure out how to do it on my own. In the end, it's a pretty simple concept, but the execution was a bit more challenging. I'm sure I made it much harder than it needed to be, but it was also a learning experience for me. So glad that's over!
Now onto something a lot more straight forward. I need to cut a groove into the bottom of the first rail to accept the top of the sliding deadman. I decided to cut the groove now, before glueing up the boards since I had already had experience with the fun of cutting a long groove in this wood by hand.
My boards for the top are 7/4 thick. The boards for my sliding deadman are 4/4. So the question becomes, where to put the groove? One consideration is that I'm seriously considering making, in addition to the sliding deadman, a sliding leg vise to go into that slot. I've seen a couple out there on other web sites and to me, it gives me the benefits of an adjustable double screw face vise while also allowing me the flexibility of two independent screws without having to worry about racking, and yet still able to have the deadman for everyday work.
But that's for the future. With this in mind, though, I decide to build the slot deeper into the front board to allow for the pressures that a sliding leg vise exert. I end up putting the groove one-inch in from the front and make it 3/4" wide. I also make it 1 1/2" deep. For my sliding deadman I will attached a piece of 3/4 board to the back of the deadman that will slide in the slot.
So, now for the layout. I get it laid out and start cutting a series of relieving cuts similar to how you cut for half-blind dovetails.
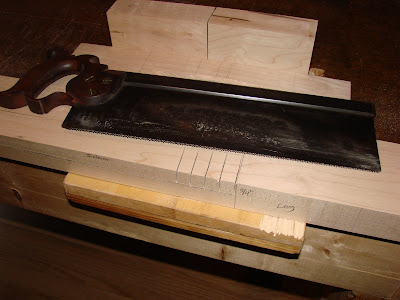

I get all the way to the end and stand up the board. That's when I realize that I've laid out and cut the cuts on the OUTSIDE face of the front board. After a short, therapeutic spell of exclamations and verbal ejaculations, I get out the last spare board I have and carefully, very carefully lay out exactly what I'm going to cut and where. This is where I come up with my daily lessons in the earlier post.
I cut the damned groove one more time, and cut the relieving cuts for the deadman slot again, this time on the inside face of the board. Notice the very explicit markup on the board.


I begin to take out the waste using my wonderful Butcher pigsticker again, as well as some other finer chisels for clean up. There was a reason for this piece to be my final backup. The grain on it goes every which way and there are streaks of discoloration all through it. I don't mind the discoloration, but the wild grain made it an extra pain to cut out this waste.

Finely, I had everything ready and I did a dry run clamp up without glue. Amazingly enough, it all fit together and began to look like a workbench.
I took the leap and glued up the first four rows of boards together. I did these as one piece because of all of the fiddly bits of the wagon vise and the opening for the planing stop at the other end.


At this point I took a break and went next door for a St. Paddy's day open house. I was temperance itself (relatively) and only had one hard cider with my corned beef and cabbage because I was anxious to get back and finish up.
I came back and began adding pieces. You can see that boards 5-14 were purposely left a bit long, as I mentioned in earlier posts. Today I will get to trim that off. In the first picture you can see the opening for the planing stop near the other end. I did trim that just a bit to make sure it was square before continuing the glue up.

In this next picture you see my little glue pot. I'm not sure where I picked it up, but it's got a big ol' brush built into the lid which is perfect for these massive glue up situations. It really lays down the glue thickly enough and yet the brush allows me to spread it round quickly and evenly. I've tried those little acid brushes, which work ok for small parts, and old credit cards (or hotel key cards) for spreading glue, but nothing works as well as this little modest glue pot for large glue jobs.

I worked my way along, sometimes adding two at a time, sometimes just one. I took my time and eventually made it all the way to 14!!


As I mentioned a couple of posts ago, I've laid out the lines to trim to using a very old carpenter's square I have. It's still square and works perfectly for this operation.

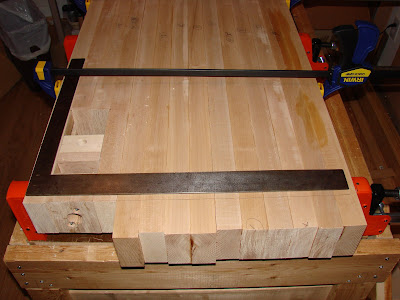
You can see here how I numbered each board. Some eventually got shifted around, as you can see by the cross outs. I wasn't too worried about pencil marks on the top as I'm going to have to flatten the top anyway and will take off the marks then. The numbers actually served a couple of purposes. It helped me keep my boards in some kind of order, and also they indicated grain direction. If I placed the board with the number right-side-up from where I stood, then the grain all runs in the same direction. This way, when I go to smooth the top I can plan from right to left and, as much as possible, the grain will cooperate.

Well, that's it for now. Today I trim the ends of the top, and try to flip it and cut the mortises for the leg tenons. I will then attempt to affix the base to the top, and get my big, strong nephew to come over and help me flip it and put it down on the ground. At that point I'll probably have to shift my workshop around to accommodate two benches while I make the leg vise.
Wish me luck!
AAAndrew
Now onto something a lot more straight forward. I need to cut a groove into the bottom of the first rail to accept the top of the sliding deadman. I decided to cut the groove now, before glueing up the boards since I had already had experience with the fun of cutting a long groove in this wood by hand.
My boards for the top are 7/4 thick. The boards for my sliding deadman are 4/4. So the question becomes, where to put the groove? One consideration is that I'm seriously considering making, in addition to the sliding deadman, a sliding leg vise to go into that slot. I've seen a couple out there on other web sites and to me, it gives me the benefits of an adjustable double screw face vise while also allowing me the flexibility of two independent screws without having to worry about racking, and yet still able to have the deadman for everyday work.
But that's for the future. With this in mind, though, I decide to build the slot deeper into the front board to allow for the pressures that a sliding leg vise exert. I end up putting the groove one-inch in from the front and make it 3/4" wide. I also make it 1 1/2" deep. For my sliding deadman I will attached a piece of 3/4 board to the back of the deadman that will slide in the slot.
So, now for the layout. I get it laid out and start cutting a series of relieving cuts similar to how you cut for half-blind dovetails.
I get all the way to the end and stand up the board. That's when I realize that I've laid out and cut the cuts on the OUTSIDE face of the front board. After a short, therapeutic spell of exclamations and verbal ejaculations, I get out the last spare board I have and carefully, very carefully lay out exactly what I'm going to cut and where. This is where I come up with my daily lessons in the earlier post.
I cut the damned groove one more time, and cut the relieving cuts for the deadman slot again, this time on the inside face of the board. Notice the very explicit markup on the board.
I begin to take out the waste using my wonderful Butcher pigsticker again, as well as some other finer chisels for clean up. There was a reason for this piece to be my final backup. The grain on it goes every which way and there are streaks of discoloration all through it. I don't mind the discoloration, but the wild grain made it an extra pain to cut out this waste.
Finely, I had everything ready and I did a dry run clamp up without glue. Amazingly enough, it all fit together and began to look like a workbench.
I took the leap and glued up the first four rows of boards together. I did these as one piece because of all of the fiddly bits of the wagon vise and the opening for the planing stop at the other end.
At this point I took a break and went next door for a St. Paddy's day open house. I was temperance itself (relatively) and only had one hard cider with my corned beef and cabbage because I was anxious to get back and finish up.
I came back and began adding pieces. You can see that boards 5-14 were purposely left a bit long, as I mentioned in earlier posts. Today I will get to trim that off. In the first picture you can see the opening for the planing stop near the other end. I did trim that just a bit to make sure it was square before continuing the glue up.
In this next picture you see my little glue pot. I'm not sure where I picked it up, but it's got a big ol' brush built into the lid which is perfect for these massive glue up situations. It really lays down the glue thickly enough and yet the brush allows me to spread it round quickly and evenly. I've tried those little acid brushes, which work ok for small parts, and old credit cards (or hotel key cards) for spreading glue, but nothing works as well as this little modest glue pot for large glue jobs.
I worked my way along, sometimes adding two at a time, sometimes just one. I took my time and eventually made it all the way to 14!!
As I mentioned a couple of posts ago, I've laid out the lines to trim to using a very old carpenter's square I have. It's still square and works perfectly for this operation.
You can see here how I numbered each board. Some eventually got shifted around, as you can see by the cross outs. I wasn't too worried about pencil marks on the top as I'm going to have to flatten the top anyway and will take off the marks then. The numbers actually served a couple of purposes. It helped me keep my boards in some kind of order, and also they indicated grain direction. If I placed the board with the number right-side-up from where I stood, then the grain all runs in the same direction. This way, when I go to smooth the top I can plan from right to left and, as much as possible, the grain will cooperate.
Well, that's it for now. Today I trim the ends of the top, and try to flip it and cut the mortises for the leg tenons. I will then attempt to affix the base to the top, and get my big, strong nephew to come over and help me flip it and put it down on the ground. At that point I'll probably have to shift my workshop around to accommodate two benches while I make the leg vise.
Wish me luck!
AAAndrew
Subscribe to:
Posts (Atom)