Saturday, October 24, 2009

Leg Vise Finished!

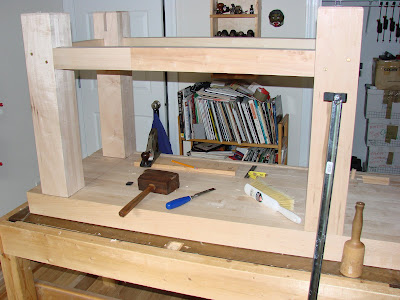
So, I've gotten a couple of weekends of work in and today I was able to finish the leg vise!

Last time I left off with preparing the vise chop. The next step was to cut the mortise for the parallel guide, drill the holes and pin it to the chop.

So, I drilled the holes for the parallel guide, which is made of Southern Yellow Pine. I got some tearout on the back of the holes, but I figure it's just a parallel guide, so who cares? Right?


I decided to pin the parallel guide in with the brass hinge pins I had used before. They seem to work well for a removable pin.


The next step is to layout the hole for the vise screw and mount it. Simple. Uh, huh.

First I had to clean off the screw and get rid of the tons of gooey, orange packing grease that it came with. I'm still not sure the best lubricant, but I ended up coating it with Boeshield T-9 or whatever it's called. It's a little sticky, so I may end up taking it off in the end and using something a little less high-tech. For now, I'm counting on regular wear and tear to get things moving smoothly.

Then it was time for layout. Having had to learn the lesson of what happens when you rush layout many times in the past, hopefully I've actually internalized it, because this time I took it slowly.

I spent a fair amount of time carefully laying out where the hole should go. I wanted it high enough for strength, but far enough down to be able able to hold some deeper boards in the vise. I eventually placed it so that with the vise screw running through the hole, I have 9" of depth for the board.

I had thought about how to drill the 1 1/4" hole through the chop and the leg. I even went so far as to purchase a drill bit for my (please excuse the language) power drill. Now, I only have a hand-held, cordless drill, but it is a good one, but it was not capable of drilling such a big hole in any test wood.

So, came back to what I should have done to begin with. I sharpened up my #20 bit for my brace, and chucked it up.


To drill the hole I put the chop up on blocks on either end so that it was not resting directly on the bench top. This way when the lead screw of the bit started to poke through, I could feel for it, and it didn't go through my bench. I then held it in my wagon vise.


Test out the hole with the vise screw, and mark the holes for the screw's front mounting plate.


When boring through the chop, I very carefully got the lead screw to come through the back, then flipped it over and finished the hole. When I did this, I worked hard to make sure the plug stayed intact. When you bore with a brace and bit and come in from both ends, if you can work to get it thin enough, the side spurs will cut through before the lip and you'll end up with a plug.


If you can keep this, it's a great little helper for figuring out the center of the big hole. I just put the plug back in when I clamped it to my bench leg and it allowed me to find the center of the hole on the chop. Stick my awl in the hole, give it a light tap with my mallet and you've got a great place to start boring.


Put the parallel guide back in, line up the chop on the leg so that it's flush with the top, and the parallel guide works smoothly. It was not that easy, but it can be done. It would be easier with two people.


I used the plug to mark the spot and then very carefully, checking for square every few strokes for the first 1/2 inch, I began to bore through the leg.


Even with a rather long bit, that is still a lot of leg to get through.


So, I get through to the point where the lead screw is just poking out the inside of the leg. Normally, you flip the piece around and begin boring again from the inside to avoid tearing out chunks as the bit comes through. But I have a problem. The brace and bit are too big to fit in between the legs.

If I had one of those fancy 90-degree big conversion things, I could do it, but I don't. So I had to figure out some way of getting at least past the surface so as to avoid tear-out.

I ended up resorting to the only power tool to be used on my bench. I got that bit I had bought for my cordless drill and the drill and started to work on the inside.


What I had to do was to strip out the center hole so that the lead screw on the bit wouldn't bite. Whenever it did, it would pull the bit right into the wood and it would freeze up.

Eventually, by running the bit in reverse and pushing it in and out, I stripped out the center hole enough that it didn't bite anymore. Later I figured I could have also drilled it out, but whatever works at the moment. Once it was no longer biting, I could very slowly and gradually work the bit into the wood so that it wasn't freezing up by biting too deeply, but was eventually able to break the surface enough that I could come in from the original side and not get tear-out.


After that it was a matter of mounting the vise hardware, and putting it all together.


And it clamps! Really tightly!


As you can see in that last picture, my parallel guide is being held with a rather unorthodox pin. I'm using a hook bolt. I like that it has a little hook which I can just grab and pull out. It's what I'm using right now. We'll see if I keep using it.


The final dimensions that I can clamp are 9 1/2" depth of clamping, and 9" tall.


The next step will be to dismantle my old bench and free up room to finally work with my new bench only. After that I'll make the deadman and the planing stop. But I needed the leg vise to make the deadman.

Finally, it really is not just looking more like a bench, it now actually functions like one.

Wooo Hoooo!

Wednesday, September 16, 2009

First Blood and Mistake # 2,456,722 and counting

It's been quite a summer with not much shop time, but I'm hoping that will begin to change. I've been able to get in a couple of weekends in the last month and I've been focusing on the chop for my leg vise.

You say, "But Andrew, that chop shouldn't take that long to make!" You're right. It shouldn't. [pause] Yeah. You're right. [sigh]

Ok, here's another story of why working in very short spurts on an irregular basis is a bad idea.

So, when I ordered the wood for the bench, I figured on some of it for the chop on my leg vise. It was some of the same 7/4 hard maple stuff I was using for the bench top. If you go back to my big burst of activity in March, in the famous Bacon Explosion entry, I talk about gluing up the two pieces I had set aside, not getting the clamping right, and leaving a gap where there was supposed to be spring, etc... I then glued up two other pieces I had lying about that were not as nice as the first two, mainly because I was too tired to rip through the original pair, plane down the original joint, and re-glue. At the time, it seemed good enough.

Well, fast forward to this summer since not much happened between the dates. I began to flatten out the chop on my new bench using my wagon vise (which works wonderfully, by the way). A quick note on what I'm using for bench dogs. I ended up using soft poplar-like dowels I got at the Borg for bench dogs. I love them. What ends up happening is that they slightly deform and become a bit flat on one side. That helps with the holding without me having to figure out just how much flatness should be there and doing it myself. It's a more organic method. (LOL)

It's pretty amazing that I can clamp tight enough to deform the wood, but they don't show any signs of breaking or cracking. The wood is much tougher than I thought it would be. And I've also had them sticking up quite high (four inches or so) and even then they were fine. They're not always quite the right diameter so some are a little smaller than the 3/4" hole. To solve that I put a very small ball catch into the side of the dog which gives just enough pressure to keep the dog from slipping through the hole. It all works great. I'll do a short post on that one of these days.

You can see the slight deformation of the dog in the image below. I'm holding a big board tight enough to do some pretty serious transfers planing without having to use my hold fasts. The wagon vise holds it firmly enough.


Back to the chop. So, I've got this big hunk of hard maple for my chop. I flatten and flatten it. I'm really beginning to hate hard maple.


I'm in a hurry when I finally get it flat and I cut it to the tapered shape and start to smooth out the saw marks from the sides. With the glancing light you can really see the low spots. They're not nearly so obvious without the flash.


You can see on the last one that I had already but a slight bevel around the edge to see how that well that might work, and to reduce the amount of surface area I had to flatten. I'm not sure that's a good idea, because it doesn't reduce it that much, but what it does do is throw off the dimensions of your bevel. But that's not quite the problem here, as the more observant who are familiar with the original plans may be able to tell. The shape is wrong.

What I ended up cutting was an elongated trapezoid with the angled sides extending straight all the way from one corner to another. The original design, and I think for very good reason, has a square section at the top for the actual chop, which then tapers down the leg to the parallel guide at the bottom.

At this point I have to make a decision: mistake or design opportunity? I hold the chop up to the leg and try to envision it being used, how well it would hold, the potential drawbacks and advantages(?) of such a shape. It just doesn't look or feel right. To now cut a square top out of this piece would mean it would end up too narrow, so it looks like I'm starting over. This is always the moment to put everything down, step away from the bench and take a break.

As I'm trying to figure out where to go from here (is now the right time to rip apart that original bad glue job, or do I need to take another trip to the lumber store?) I remember a hunk of wood I've been carting around for quite a while. We all have something like that. A piece of unusual or just interesting wood you keep thinking you'll use for something, but never get around to it. For me, it's a (relatively) big hunk of mahogany I picked out of a scrap bin. It's 40" long, 12" wide and just over 8/4. It has a couple of knots and some chips off the edges. It also is still rough sawn, but it was free, and mahogany. Oh, and did I mention the sap wood, etc...? I picked this up when I really didn't know any better, and it was free.


As I'm flattening it, I can definitely tell this is NOT hard maple. It takes some work, as the board is also twisted and cupped. (I'm starting to really understand why it was in the cut-off bin even though it was so large) It's got a big ol' knot in the middle of one side but even that planes pretty easily. Did I mention it was free?


I get it pretty much flattened up, very carefully mark it up and then cut out the basic outlines. I leave a fair amount at the edges because at this point I'm being overly cautious and insecure.


I plane down the excess I left on the board using the cutoff as a wedge underneath the side of the board. This is where I use the wooden dogs set pretty high up the sides.

I tried a few of my planes including a circa 1940's Miller Falls(?), #6C-type, Craftsman plane, and finally ended up with my trusty newer Stanley #6 with a Hock blade. You can see the nice shavings I was eventually getting in the picture above. I have a special fondness for the #6 as they are generally depricated by followers of Mr. Leach since he equated them with the Prince of Darkness and declared them useless. This makes them cheap, but they're still big hunks of iron and do a good job of being a big jack plane for flattening large surfaces like my bench top, and can do duty as a short joiner on smaller edges like my vise chop. And once I put the Hock blade in my crappy Stanley it works beautifully.

Craftsman plane. Notice original sticker on handle.


Stanley with Hock blade.


Once I got the sides down to dimensions, I started putting the bevel on the edges and do a final smoothing of the faces. For the smoothing I pulled out a great old Type 11 Stanley #5 Jack plane with its sweetheart iron. I tried my Miller Falls smoother, but it just didn't do as nearly a nice a job as my jack plane, so that's what I stuck with. As Kent Beck would say, "Do more of works and less of what doesn't."


And here it is propped up where it will eventually go. I've left a little extra at the bottom so when I chop out the mortise for the parallel guide I have some extra heft and hopefully avoid blowing out the bottom.


And speaking of the parallel guide, I needed to make one of those as well. I just used a piece of straight-grained, 1x4, southern yellow pine that's been in my workshop for quite a while. I marked around it to the dimensions that I wanted which I determined by what would fit into the slot I already cut in the bottom of the leg. I planed it down with my Stanley #6 with the Hock iron, this time set a bit more aggressively.


When I attacked the edge, from which I needed to take a good 1/2", I thought I'd try out my German scrub plane on the job for which it was supposedly designed. I'm not so sure I buy that theory. It was really difficult to keep the scrub on the narrow edge. It resulted in me cutting a nice, shallow gouge out of my finger as I slipped off the edge of the board. I ended up going back to the big Stanley with great success. I did notice, though, the bench's first blood.


It's not much, but I hope it's enough to appease the bench gods who always demand a sacrifice for the new bench, just as my kitchen knife gods demand a blood sacrifice for every new knife I get. I tend to only need to give one sacrifice per knife, so hopefully this will mean I will not need to bleed on my bench again.

One more new thing I was able to do with my bench which was use my wagon vise to hold the parallel guide for planing off the end grain markings. The vise holds things really well in this position. I think I'll have to use this for small drawer and box sides. Another plus for the wagon vise.


Next time, whenever that will be, I will start the harrowing process of cutting the mortise for the parallel guide and pinning it in place. And, of course, boring the holes and cutting it to size, first. This time I will take my time and make sure I don't have to do it all over again. A lesson I seem to need to learn several times each project.

But it's getting closer. Once I have the leg vise in place and working, I will finally dismantle my old bench and have a lot more room in my tiny workshop. Then I can make the sliding deadman and the planing stop. (which I should probably make next, but so far I've not missed it with my great wagon vise)

I might get some shop time this coming weekend, but then not for a while. It will be time for fall gardening and we have a bunch of trees and shrubs to move, and we have a two-week vacation in there somewhere to Flagstaff, Arizona, so there may not be much activity for a while. But then once all that is over with, I suspect I'll get a bit more regular shop time as gardening shuts down for the winter.

AAAndrew

Wednesday, June 24, 2009

Work Sharp Hints and Tips

I started to write this as a response to a comment but it became too long and involved, so I thought I'd throw it up here as a post by itself. This is my personal experience with my Work Sharp 3000 and how I've learned to use it best for what I do and how I work.

Hmmm. General advice on the Work Sharp...

Up until very recently I was using the Work Sharp (WS) the standard way, by putting my tool on the bed of the port underneath the wheel and moving it up and back, etc... It works pretty good with some caveats.

Small chisels, for example, were hard to keep straight. Even though fence would be tight up against the tool, because not every chisel is perfectly parallel all the way, some taper a slight bit, that means it would be tighter at the bottom of the fence then at at the top. This leads to the problem of grinding the edge at an angle, rather than 90-degrees across. Once you realize this about a particular tool, you just have to learn to compensate by figuring out which way you twist it to counteract the force of the spinning disk that wants to pull your tool off of center.

I also have a little trouble with the port because the abrasive on the base of the port is rougher than what you're using to finish the bevel. So, even if you're using 3600 or even 6000 on the bevel, the scratches on the back will be something like 220 (I think that's the grit of the abrasive).

When I got the wide blade attachment, and began to use it, I realized how much easier it was to use the whole machine like a scary sharp system that moved for me.

The wide blade attachment is an aluminum bed that attaches to the side of the top of the glass disk and makes a theoretically flat, parallel bed off of which you can use their included honing guide with the abrasive on the spinning glass disk.

The trick to the aluminum bed is to make sure for each disk you put on, that you check the level of the bed against the disk. For some reason, thickness of glass disk, thickness of abrasive paper, or whatever, different disks require me to adjust the level of the bed each time. Fortunately, that's a relatively simple and quick operation involving a small allen wrench I have hanging on the pegboard behind my bench.

The operation is a fast as, unscrew the top knob, replace or flip the wheel, screw on the knob, check level and give a quick quarter or half turn with the allen wrench if needed in one or both adjustment holes, turn it on, and sharpen. All together it takes me about 10-15 seconds to change a wheel and adjust. This is more than made up for by how fast I can sharpen a tool because I don't have to move the tool, I just have to focus on keeping it at a consistent angle.

Once I've established an edge, it takes me less than a minute to take a really dull chisel back up from 1000 to 3600 to 6000.

With plane blades, I use the honing guide. The trick with their honing guide, and perhaps using one of the other ones out there would be better, is to make sure the blade's clamped tightly so it stays consistent across wheels. If I have a lot of work to do on a blade, then I'll go all the way back to the 80 grit. Otherwise, I treat it like I do the chisels.

The Work Sharp is great for flattening the back of a plane blade. The trick to this is that you only really have to care about the top of the back, i.e. the part right up against the edge, and when you go apply the plane bade to the wheel, tilt it downwards so that the important part of the blade touches last. If you try and place the blade straight down thinking you're going to be parallel, you won't be. You're instead going to be in danger of dubbing over the back and putting a micro-bevel on the back of the blade. If that's what you're looking for, fine, but otherwise, touch the edge of the wheel first with the middle of the blade (don't worry, you won't carve a groove in it) and bring the edge of blade down last. I've had great luck getting even knarly, corroded old blades to be in great shape using this. It takes much less time than any other method I've used.

Two other accessories you'll need: Sharpies and a Magnet.

The Sharpie marker is great for knowing just when you've worked over a piece of metal and when you're not quite there. Sometimes it's nice and obvious, but for those pieces that require a lot of work, or for tricky tools, like small bevels, I'll draw lines along the surface I'm grinding with the sharpie and then when the lines are all gone, I've taken off the surface I need to and can move to the next grit. It's quick, cheap and invaluable for knowing when enough is enough.

The second accessory I've found invaluable is a magnet. The one great drawback to the WS, which is true for any dry sharpening technique, is the production of lots of iron filings. This is a messy operation. I've found that by having a large magnet around (not a massive one, but something large enough to handle a bunch of filings, but no so large it messes with the electronics in the machine) that cleanup around the top and on my bench is much easier. I'm actually keeping the filings in a small plastic container and will find some use for them later.

This brings up the topic of heat. As you're grinding metal on abrasives you will produce a fair amount of heat. You get too many iron filings around and they can actually catch on fire and create sparks. Be careful where you use your Work Sharp. Mine is in the garage away from any flammables and I'm always keeping an eye out for where the sparks go and try to keep them down to a minimum by wiping my blade on a folded paper shop towel sitting on my bench in order to take off most of the excess filings that can stick to the blade itself.

The advantage of using the designed port for sharpening is that the base of the port is made as a heat sink so that it takes away some of the heat on the blade when you draw it back across the abrasive bed. I use the aluminum base of the wide blade attachment as the same thing as I'm grinding. I keep my fingers close to the edge of the blade, and if it gets too hot for comfort, which it will do fairly quickly at the lower grits, then I'll flip it over and press the back of the blade to the aluminum bed of the attachment, and hold it down tightly using the rubbery abrasive cleaner that comes with your Work Sharp. It only takes a few seconds, generally, for the heat to dissipate enough to resume work.

And speaking of the rubber cleaner, I always run it across a disk as I change or flip it. This makes the disks last a whole lot longer and cut better. I leave the motor running and just start on the inside and draw it outwards to the edge. It works fine.

Hmmm. I'm not thinking of anything else at the moment, but if you have specific questions I'd be glad to answer them. I will say that i've not yet used the slotted wheels for under-wheel sharpening, but plan to try soon. So, I hope this has been useful.

Overall, I like the Work Sharp. It's a solid piece of machinery that I've made to work well for me. It makes the drudgery of sharpening a bit easier and I've gotten better results than other ways I've tried. Others, I'm sure, get better results with other methods, but the important thing is to work with sharp tools, regardless of how you get there.

Cheers!
AAAndrew

Oh, P.S., I have no relationship with Work Sharp, have never spoken to them except to ask customer service a question, and haven't gotten so much as a brass farthing or single sheet of abrasive from them. It's just my opinion.

Monday, June 22, 2009

Where, oh where, has the little woodworker gone?

Summer is never a good time for woodworking in the Incidental household. Spring and Summer are not the only two seasons this time of year. It's also gardening season and performance season. Mrs. Incidental teaches ballet and so requires a lot of extra time during performance season and that's when I get to watch the Galoot in Training (GIT) who, at four-years-old, is still young enough to need me nearby and paying attention, and I'm still "responsible" enough to not just stick him in front of the TV while I go off and woodwork. (thought I'm sure he'd be fine with that).

Mrs. Incidental is also an avid gardener. Here in North Carolina the growing season is very long (March to October) but there's a hole in the middle where gardening stops and it's just mainly maintenance. That's just beginning about now when it gets just too hot outside to do much more than deadhead and mow the lawn.

So, it will soon be time for me to get back into the shop. As a matter of fact, I did get some shop time this weekend, but it was all taken up with the woodworker's favorite job, sharpening.

Since that seems to be a subject of much debate, interest and religious wars, I'll briefly mention what I do to keep my tools as sharp as possible. (which we all know to be important)

I've tried various means through the few years I've been butchering wood. Scary sharp was my favorite for a while, but I got tired of changing the sandpaper and could never keep it cutting well for very long. But it did teach me to be pretty good at free-hand sharpening, at keeping a fairly consistent position with my hands. But it also seemed to take for ever if I needed to re-grind a blade, especially a plane blade, that had gotten out of square or had a nick in it etc...

I've never seriously tried water stones as I'm too cheap to get into it, and for the ones where you have to keep them soaking, I just don't do it often enough and I'm afraid of the water getting funky before I come back to the stone. I tried a couple of oil stones and a synthetic stone or two. I have an old razor hone that was new-in-box when I picked it up an an antique store that's kind of fun to use for a quick hone of a paring chisel while I'm working, but none of them seemed to find the right balance of cheap, easy, fast and effective.

In the end I decided to meet myself half-way on the cheap part and splurged for a Work Sharp 3000. These are the spinning machines with the horizontal glass plate that uses sandpaper for the abrasive. They look like they're a really cool design and they are pretty well-made, but it's taken me a while to figure out the best way for me to work with mine.

After a couple of years of sharpening on it I've found that for me, I almost never use the sliding port at the bottom that is meant to be the primary point for sharpening. Instead, I bought the wide blade attachment which gives you a wide, flat surface adjacent to the top of the spinning plate. With this and a honing guide, I can sharpen just about anything with minimal fuss and pretty darned good results.

I have a set of glass disks with various grits on them: 80, 120, 220, 400, 600, 1000, 3600 and 6000. I also have a leather disk with green rouge, but have never gotten into using that.

For plane blades I use the honing guide and the wide blade attachment. For chisels I'll use the honing guide the first time to repair a crooked or badly chipped edge. (remember, I'm fairly cheap so I'll buy good chisels in bad shape if they're cheap) Once I get a good edge on a chisel, I can sharpen the edge extremely quickly by hand. Once you have a good technique for hand sharpening, it's really easy on the Work Sharp because you don't have to move your hands, just keep them still. The disk moves for you.

To re-hone a blade, I'll usually start out at the 1000, or maybe 600 if it's seen a lot of use, and then spend a few seconds on each grit back up to 6000 which puts a mirror finish on it. Easy peasy, 30 seconds for a chisel.

The disadvantage of the Work Sharp is that it's harder to put a camber on a plane blade, but I'm working on that skill as well. It's also not as sexy as a set of exotic Japanese, high-tech, water stones. But it works for what I do.

Overall, my goal is "sharp enough" without having to get into the level where you hold the blade edgewise to a stiff breeze for the final honing. It will fall off of that level of sharpness the first moment you even look at the wood. And I've seen some amazing work down by workmen just taking a few swipes on a rock. So, I don't get all too fired up about absolute perfection with my sharpening, and the Work Sharp, which sits on my fix-it bench in the garage is good enough for me, especially as I've found the way that it works best for my skills (or lack thereof).

If anyone's interested I have a few more tips for working this way with a Work Sharp, but I don't want to turn this into a Work Sharp workshop. (say that five times fast!)

So, I will be back working on the bench in the next month or so. I have to finish up sharpening the tools I've been dulling on the maple to this point, and then I'll get another week in July to finish up the bench, so look for more activity at that point. (did I mention that my woodworking was rather incidental, and sporadic?)

Thanks for those who have noticed that I've been a bit absent these last couple of months. In the words of the immortal bard, "I'll be back." (that was Shakespeare, wasn't it? No? Well, his name started with an "S" so close enough)

AAAndrew

Sunday, April 12, 2009

It's beginning to look a lot like a bench

I've been doing the fettling and other stuff readying the bench to be a bench.

In my haste to get the top onto the legs, I noticed that I had neglected a few small gaps that could have been better in the fit of the legs to the top. So, I flipped the bench back onto my old bench and began the fiddling. (or fettling, but there's a fine line between fettling and messing things up, so I prefer to fiddle around and do a little too little than go over the line and do too much.)


I was mainly worrying about trying to get the top to sit more closely to the shoulders of the tenons on the ends of the legs. It's not perfect, but it is better than it was, and the outside lines are better.

While I had the bench turned upside down, I took the base off again and did some final smoothing of the legs that had either been neglected, or at least short changed in my excitement to get it together. I think this is part of the phenomenon of having only a few hours each week in the shop. I am so anxious for it to look like something that I often cut some essential corners to get to a more tangible stage. Well, that was part of what last weekend was all about. I popped out the brass pins, and all but one came out quite easily and smoothly. I then smoothed down the legs and stretchers to make everything as co-planer as possible.

It worked pretty good. I was a little surprised by one piece of wood on one of the short stretchers. It was significantly different than the others. It was more splintery, was less prone to a smooth finish and overall behaved much less well than the rest of the maple. It looks like maple, and may well be maple, but it's from a cursed tree. I'm glad it's only a short stretcher.


While I had the bench top on my old bench, I thought I'd try and do some more smoothing of the top. I got out my big 'ol Knight razee joiner and went to work coming down the top with the grain to take out the scallops from transversing the top.


You can see the scallops along the top of the bench, with the smooth side closest to the photographer. This plane works quite well, and I was both pushing and pulling as I worked across the bench top. I can only imagine what it must be like to do this with an 8-foot bench.

This weekend I started to put holes into my beautiful bench top. I wanted a template of some kind, and decided to use my oh-so-awfully-used bench hook. I made myself a nice maple one from scraps and then took my old pine one and drilled the holes to match the spacing for my bench.


I tried experiments with my jennings #12 and my two Irwin #12's. One of the Irwin bits cut a much smoother hole (I'll have to check the cutters on the others later) and so I used that one. I first positioned the first hole in the chop of my wagon vise and put a brass dog in it since that hole is a little larger than 3/4". (see my earlier posting about making it with a #13). I clamped a piece of scrap under the bench to help avoid tearout. I know it won't be shown, but I've seen some amazingly spectacular tearout before and I didn't want that, even on the bottom of my bench. It worked as well.


The 10" sweep of my brace was absolutely necessary and I made sure my bit was sharp and waxed. Even so, this was hard work.


I bored out the first hole, and as I was getting to the bottom I realized that it was going to come out right into the leg. Not good. I had placed the holes in my old bench hook so that I was not able to get a hole past the leg with my current configuration. Look at the picture above and see that the left-most hole is still not completely past the leg.

I solved this by boring another hole in the bench hook. You can see it to the far right in the picture below. I then put a dog in there and through the wagon vise chop, adjusted the vise to put the hole as close to the leg as I was comfortable, and then bored away.


For each hole I would use two squares to line up the brace and bit as perpendicular as possible. After each hole I would hold up an old candle to the screw, cutters and flutes. The heat of the bit would melt a nice trail of wax down the bit. I would also usually get a nice plug of wood down by the end of the bit every time. You can see this in the picture below along with the rather course screw pitch of the bit. Despite this being so corse, it worked better in this hard maple than the fine pitched Irwin I tried. You can't always take what the old guys say for granted. Sometimes you've got to just try it and see.


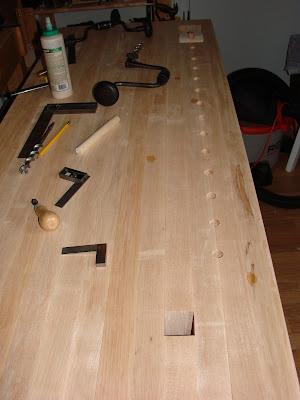
I eventually worked my way down my bench. I wondered where to end the holes, and after looking at some pictures, and thinking about it a bit during a rest break, I decided to end them just shy of where my leg vise will come. If I need some holding point after this point along my bench top, I can clamp a planing stop in my leg vise. You can see some drops of sweat on the bench top. That's some honest work there. A lucky 13 3/4" holes through 4 inches of hard maple.

You can see two braces on the bench top. The other one is a smaller, 8" sweep Fray-made Spofford brace that I used a couple of times to come at the hole from the bottom when I stopped too soon, or the bit wouldn't bite anymore once it broke through. I couldn't fit the 10" sweep brace between the bottom and the front stretcher, it was too long. The 8" Fray is my favorite all-around brace anyway. I rarely need ratcheting, and it's as stable as it gets. The sweep was just too small for this big job.


You can see the Spofford chuck in the picture below. I had originally drilled the holes in my bench hook with this brace, I said it was my standard brace, but then I realized that the picture seemed to indicate that was to be boring the holes in the bench with this brace, and I switched the bit to the real brace.


For full tool disclosure I went and checked to make sure of what I used.
Big brace. No markings other than "No. 120". Wooden handle with pewter rings, two-jaw chuck.
Small brace. Marked "Fray No. 110" Don't know if this means a 10" brace. I may be underestimating my brace sizes. It is definitely smaller than the other one.
Bit is a Greenlee, Irwin-style, #12 bit.
Oh, and one square was a cheapy engineers square, the other is a great little 4" Union Tool sliding square I just bought from Bob Rozaieski over at Logan Cabinet Shoppe. It's in perfect condition and well compliments my 12" Union Tool carpenter square, but much cuter.

I've now ordered my holdfasts from Tools for Working Wood and will figure out my hold-fast holes based on the hold fasts. I tried out my cheapy cast holdfast I was using in my thinner bench. It just won't work at all in my new one. Darned, I need new holdfasts. What a tragedy.

Next time I am going to use my wagon vise and dog holes to start to make my leg vise. Once I get that done, then all I have left is to make the plane stop, put a basic oil finish on it, and I'll have a brand new bench!

It's beginning to look a lot like a bench!

AAAndrew