Saturday, November 14, 2009

French Frames: Part 2

I got some time yesterday in the shop and was able to put together the first prototype frame and make a couple of holders for it. I learned some drawbacks from the design and I learned some of what I need to keep in mind when designing holders.

Overall, I think this might work, but I can see that I may need longer frames. Three feet may not be long enough to hold everything since a lot of tools hang down and so you're not able to use every rail on the frame.

Ok, so here is what the frame looks like when it's built.


I had a small cabinet hanging on this wall over my over-stuffed book case so I took it down and hung a cleat on the wall for my testing area.

As you can see, it's nothing much to look at in southern yellow pine. God, that stuff is ugly. Anyway, here's how it looked going together.

As I wrote last time, I first made a jig to standardize the cleats going across.


I merely have to put the board in the slot, run my circular saw up against the fence, and voila! I have a cleat for the frame, and a matching cleat for a holder.


So, after I did my first board to show that the jig worked, and it works great except if the board is particularly warped, I started cranking out two-foot sections for all the cleats on the frame.


This is faster to do on my bench hook with my disston backsaw. I guess I could set up another jig on the end of my other one to cut two foot sections on my circular saw, but I just don't like the screaming machines and only use it when I absolutely have to.

So, once I got my rails together and cut them into cleats I built my second jig, the one that will help me construct the frames square and consistent. What I needed was a simple board that kept the two sides straight and parallel to each other and I wanted a quick reference to place the cleats for nailing. I used an old piece of woodstalk fiber board for the base, and a couple of 1x2 for the side rails. I ran my gauge up one side of the board to get a reference line then nailed one of the side rails in place. I then measures where I thought the other line should be and drew a line on the board. I then took my cleats and used them as a reference to double check my line, and it was right on. I then nailed the second side rail in place.


I worked out spacing for the cleats and figured that about five inches between the bottom of one cleat and the bottom of the cleat below it would give me enough clearance for whatever holders I might use. The top cleat didn't need to be down so far from the top, so it's just four inches. You can see my spacing on this next picture.


Now, my jig is only twenty-six inches long, so I start with the two side pieces of the frame pushed up against the front of the jig and line up my cleats down to the 24" mark. After I nail them in place with three 1 1/4" bright finish nails on each side, I move the frame so that it lines up at the bottom and because there are two inches left on my board at the bottom, and two inches left on my frame at the bottom, I can use the last two marks, the 19" and 24" marks as the 29" and 34" marks for the last two cleats. This may help with the explanation.


Here you see the 19" mark is also marked as 29"


I turn it over and nail on another cleat to the back that will allow the frame to hang on the wall and Bob's your uncle.


Here you can see the nails and how I put them in to try and minimize splitting.


So, the next step was to try and make some holders. I decided to try a chisel holder first, and somehow got the idea of drilled holes, with slots cut in to go back to the holes which would then hold the chisels.


A couple of problems.
1. It was a really stupid design that didn't work.
2. The wood was really brittle and kept breaking off in between the cuts
3. It was a really stupid design that didn't work.

So, I moved on to something to hold my squares. I settled on a board with slits cut in it to hold the blades of the squares. I ended up pulling out my tiny 1/8" pigsticker mortise chisel and cutting the slits. It worked pretty good, but it's very difficult to get a clean mortise in poplar at 1/8". But it was good enough.


I glued and nailed it to the mounting cleat and hung it up.


I discovered one the shortcomings of this frame design. When you have a weight hanging out away from the frame, you must stabilize it in front or else it tends to tip out of the cleat. I also realized that since there is no back to the center of the frame (remember, the cleat, being merely nailed on, stands 3/4" out from the wall) I also need to either to use only full width cleats so that it touches the side rails in back, or need to add something to give it a back or front when I make something that could tip out like this one. Later in this post I'll show you a kind of holder that doesn't tip out, even if it was short enough to fit between the sides.

To try and counter the tip-out I did a quick and dirty nail-glue some small pieces along the front of the hanging cleat to see if that helped.


It did help, but not by much. I need to have a more substantial front piece. So, I'm in the process of re-doing this holder.

Meanwhile I made another holder, this time for my chisels. I have a bunch of odd chisels and one unified set. I tried to decide if I wanted the set all by itself, or to mix it in and arrange them by all by size. Since my set is just a cheap Czech.-made set (but they're good chisels, just not terribly fancy) I decided to just add them in and keep them all by size for now.

I was not going to go back to the really bad design I started before, so this time I remembered what I had originally thought for a chisel holder way back when I started thinking about this system. I took a 1x4 of "clear pine" and started cutting out grooves. The only measuring I did was to put the chisel down on the board, get it fairly straight with a small square, trace along the edges of the chisel and then cut down a ways with my back saw, then chisel out the groove. When I do this again, I'll set the depth of cut with a reference line, but I was pretty much freehanding this to see if it worked.


The wood was soft enough that I used my mallet to do a controlled cut at each end, but the middle stuff I could take out by just pushing the chisel along. These went very quickly. I only had a couple of pieces between the grooves chip out, but I just put a dab of glue on, pressed it down for a few seconds, and went on. It all got sandwiched in later and is fine.

Here's where I made another mistake. In my desire to keep my bench as clear as possible, as I cut a groove for a chisel I would put it away. The problem I encountered is that by not having all the chisels there as I cut, I ended up not taking full consideration of handle width as blades got narrower and narrower. I kept a fairly consistent distance between blades, but what i really needed to do was keep a fairly consistent distance between centers of the grooves. As the blades got narrower, the total distance between the centers of the grooves got smaller and smaller so in the end I couldn't fit two of my chisels into the holder as I had planned. Lesson learned.


After cutting the grooves, I glued on a wider piece of poplar to the front. I used a wider piece in order to hide some of the sharp edges of the chisels that were longer than the 1x4. This gives a more finished look and helps avoid any accidents as I reach for something on the frame.

You can see towards the end with the small chisels they're pretty crowded. Bummer. Otherwise, it worked out great. Since this picture was taken, I have started to use this blank space on the front. I have hung my sliding bevels on small nails, and cut a rabbet into a small piece of poplar and glued it to the front so I can put my steel rulers up there as well. Pictures on that later.


Here's how it looks hanging on the whole frame, and then with my sub-standard holder for my squares.


And here's the back of the chisel holder to show you the ends of the chisels hanging down out of the 1x4 and why I put the wider piece of poplar in front.


So, with this kind of holder, where the weight is pulling straight down, and there is a piece that is flat against the front of the cleat on the frame, it works perfectly. I can see that for other kinds of holders, such as the shelf holders I'm envisioning for my planes, I will need to makes sure the hanging cleat is enclosed in a way that keeps the whole from tipping out of the angled connection. It's a good lesson to learn now, with my crappy SYP prototype.

I'm getting the hang of just what works and what doesn't and just what goes into making a holder for these frames. The tricky parts will be making hanging boxes or other types of holder for small things I've got in boxes on shelves at the moment. But that will also be some of the fun. And right now I may end up creating a frame for a whole shelf, but in the end I may not want all of that stuff that's currently on one shelf to be together. That's where the flexibility of the system comes into play. Once I have all of the frames together, then I can move the stuff around to fit how I work.

I'm excited to start making some more holders and figure out what works and what doesn't and get this party started. I think, in the end, that if I make the frames longer, and get creative with the holders, this will be quite a fun system for holding and storing tools. It kind of reminds me of the Shaker system of pegs where they could hang coats or whole cabinets off of pegs. It's flexible, easy and cheap to make and allows me to change my mind, add tools and change around my shop. It's not as beautiful as some of the gorgeous furniture the real joiners make, but I think it will work for me and my shop.

Update: Here's a picture of the addition of a ruler holder as well as the sliding bevels hanging from the front. Not sure if I want to keep these two types of tools with my chisels, but I'm just experimenting with different kinds of holders.

Thursday, November 12, 2009

French Frames: Part 1

I mentioned in an earlier post an idea I've been toying with regarding a way to store, display and basically keep organized all of my tools. I've thought about cabinets, about shelves, etc... but I keep coming back to an idea I got from a picture in a magazine, and a commercial shelving system I've seen in several stores.

First basic concept to understand is the French cleat. A French cleat is basically a board with one long edge trimmed at an angle. (I've discovered that 30-degrees seems like a good angle that compromises strength with holding power) The board is screwed into the studs with the angle facing into the wall, so the wider face is outward, and the narrower face against the wall.

The second part of the French cleat is a mating piece that is also cut at the same angle. This is affixed to the cabinet, or shelf or whatever you're hanging from the French cleat on the wall. When you slip this angled piece down into the slot formed by the piece screwed to the studs, the hanging shelf or cabinet is held close against the wall and secure, yet able to be moved quite easily. You just lift it up and move it. This wonderful, and simple, invention is the basis for the whole design.

The basic idea is to make a frame about 24" wide by 36" tall. This frame will have a french cleat in the back and hang off of a cleat running around the perimeter of my shop wall. Each frame will also contain a set of french cleats running across the width of the frame. These will be used to hang various forms of holder and even shelves to store, display and basically keep organized my tools.

In this way, I make a series of interchangeable, flexible, hanging frames that allow me to create all kinds of various solutions for hanging my tools on the wall. And as I add more tools, or change the place where I want to store them, I can easily move the individual holders.

I like the idea of my chisels all hanging together in graduated sizes. But what if I get more chisels? What if I decide to get a new set, or get carving chisels and want to store them in the same place? If I've created a fixed cabinet, then I have to either make a new cabinet, or re-arrainge the old one. Both of which are much more labor intensive than making a new holder for the new chisels and shifting the current tools around to find room for the new hangers.

I've been thinking about this for quite a while but I've had my Roubo bench to finish. Well, now I'm mostly done, at least for this work, and so tonight I had the opportunity to get some shop time in and I began the process.

I'm going to first create a prototype out of a bunch of 1x4 southern yellow pine. It's not pretty wood, but I have a lot of it, and if I screw up this wood, it's not a big deal.

One of the keys to building this system will be standardization. If I had a table saw, I could set it up for 30-degrees, set the fence and go. I don't have a table saw. I did try cutting the boards with my rip saw. I can do it, but it's a real pain because to cut at an angle, I can't use the sawing bench very easily and get a good, consistent angle. I have to put the wood upright in my vise. Again, it's difficult to get a fairly consistent result.

What I do have is a circular saw. So, what I did tonight was to build two jigs. These are my first jigs ever. I've built appliances for hand tool work, but never a jig for power tools. One of the jigs holds the two-foot section of 1x4 and includes a fence for my circular saw. I plop a piece of wood in the jig, fire up the saw and saw right through. I still need to take a pass or two with a hand plane to make the surface nice, but this gets me consistent enough results.

The second jig I created is for construction of the frames. I took a piece of fiber board and nailed some cleats on it exactly parallel and 24 inches apart. I can then place the side stiles of the frame in this jig and it has the locations for the French cleat rails that extend across the frame marked on the side cleats to facilitate affixing them to the sides.

I cut up the wood for the first frame tonight and got it laid out. It works out quite well. My next question I will hopefully answer with this prototype is how exactly I will affix the French cleat rails to the frame. I'm thinking of a dab of glue for luck, and either nails or screws. Nails will look better, I'm thinking screws will hold better. But I could, if I wanted to go to that much effort, do a clenched nail since the frame will stand out from the wall at least the distance of the thickness of the French cleat on the wall. I think I'll have to look up clenched nails again and see if that's what I'd like to do.

Tomorrow I should be able to get this frame put together and work on making some holders. They may not be pretty to begin with, but I've got to start somewhere, and this is only a prototype. Right?

Update: After doing a little research online, I think I'm going to try and clench (aka clinch) nails to hold the cleat rails on. I'm going to have to look for some good nails that are about 1.75" long with a wide head. Nails can be incredibly strong, we usually underestimate them, and this technique supposedly can increase the holding power quite a bit. We'll see tomorrow.

Friday, October 30, 2009

This is a test, this is only a test.

I'm trying out how well this works by coming directly from Picasa. I'm more interested in how I might be able to get larger pictures into my blog. Can I get more than 400 pixels wide?

This is just a test, it is only a test. We now return you to your regularly scheduled blank space.

AAAndrew

Update: I have discovered that it will link back to the full-sized photo. So I will leave this up for now in case you want to see the bench somewhat up close.
Posted by Picasa

Thursday, October 29, 2009

Wagon Vise

A commenter asked about the wagon vise. Since I think it's a great addition to my bench, I thought I'd share a few thoughts about it.

The general concept is an old one, and I first encountered it from first Chris Schwarz's blog over at Woodworking Magazine (see blog roll on left), and then again in his workbench book. (which you should buy, right now. Go ahead, I'll wait......Back again? good)

The details of execution I came up with myself. I didn't want to do a bench bottom installation, and I thought, since I was designing this from scratch, and could incorporate it any way I wanted, I'd design it to be built-in to the bench itself. This allowed me to keep the design very simple, which is a benefit for an amateur like me.

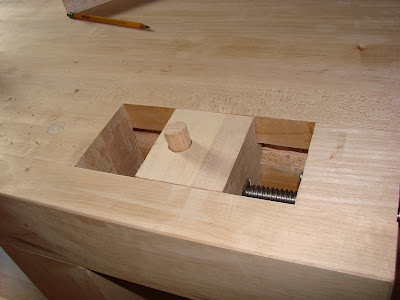
The essential design is a block of wood (the chop) attached to the end of a small bench screw. The screw is fixed at the end of the bench, and the chop slides along a pair of grooves cut into the faces of the adjoining boards.

My top is made up of a series of 7/8 thick boards glued together. Board 1 is at the front of the bench where I stand, and board 14 is at the back. Board 1 is full length. Board 2 and 3 are short, thus creating the gap for the wagon vise. Board 4 is full length. There is a groove cut into the inside faces of boards 1 and 4 down which the chop moves. At the end of boards 2 and 3 is a block through which the screw passes and into which I inset the nut of the screw. This block is just glued face-t0-face with boards 1 and 4.

Here's a bad copy of the Visio drawing I made of it.


Update: I realized the I forgot to point out that my original drawing had the vise only one board wide, but when I got past measurements, and got to the real objects, I realized that I needed to make it two-boards wide. You must always be ready to change design in the face of reality. At least those of us as bad at design as I am.

Here's a photo of it installed. You can see the groove and the tabs on the chop that slide in the groove. You'll notice that I made the chop so the grain went the opposite direction of the bench top. I did this because I had to laminate the chop together to encase the pad of the bench screw.


Perhaps this is a good time to revisit how I built it. (you can read my account at the time in an earlier post)

First the chop. I had to make this several times as I kept learning and screwing up the layout dimensions. I also started to go down the path of a half-dovetail design for the tabs and groove, but realized what a total pain that was going to be to cut in the hard maple. So I went with square, which works just fine.

First I cut out the three pieces and then ganged them together to cut the tabs.


Now, this is what the screw looks like.


It's a press screw for book presses or cider presses. The pad on the end has no built-in means of affixing it to a chop. I decided I didn't want to drill holes in it since I wasn't sure how all of this would work, and if I'd need to change the screw, and if the holes would weaken the already small pad. So I designed a means to encase the pad in the chop in such a way that i could take it out if necessary.

Here's the back-most layer of the chop. The keyhole shape is to allow the collar of the pad to stick through, and the slot in the bottom allows access to the bolt that holds the pad to the screw.


The middle layer of the chop I cut out a recess to accommodate the pad.


It was at about this point that I decided not to make the pad removable. I still needed access to the bolt to affix the pad to the screw, but I left the recess for the pad in the second layer just big enough for the pad. I then glued it all up.


Here it is all glued up and ready for mounting.


Here it is with the screw installed. The piece of scrap you see shows my initial thoughts on a half-dovetail design for the tabs.


The dog hole in the chop goes towards the end.


After that, it was time for the grooves.

After careful layout, and a lot of trying out prototypes (both of the design, and the technique to make such big stopped grooves), I cut the grooves. The grooves are about 1" wide and about 1/2" deep. All I had was a 1/2" pigsticker mortise chisel, a great big mallet and ear protection.


Here you can see how the chop slides in the grooves.


Making the block at the end that holds the nut for the screw was also a bit of a challenge, mainly because drilling out a large enough hole through end grain of hard maple is not a fun thing. I tried a bunch of different ways with what tools I had and ended up doing the e pluribus unum technique, "out of many holes, one" approach.


You'll notice the final hole is not exactly round, but not as distorted as it appears in the last picture. But it was good enough.

I tested it for length. (I learned, the hard way, to leave the boards all a little too long on one end and cut them off at the end rather than try and cut them all to perfect dimensions. There are no perfect dimensions)


And in the end, after gluing up, screwing up the glue-up and having to reglue (read back a bit in the blog for all the fun), I ended up with a great little wagon vise. It seems small, but it really holds quite well. I could pick up my bench, if I was strong enough, by a handle squeezed in my wagon vise. And I ended up using mainly wooden bench dogs made out of lengths of dowel with a little ball catch inset into the side to make sure the ill-fitting, cheap dowels don't end up on the floor too easily. I was afraid these wooden dogs wouldn't work, wouldn't hold, but even the soft, poplar-like ones from China just end up distorting a little bit to make a flat side, and hold like the dickens.


Even when I stick the dogs up high, it holds like a champ.


And for narrow stock, less than 3 1/4", I can clamp it directly and then nothing is moving when I do that.


I find that sometimes putting a wide piece of scrap in between the dog and the piece I'm working on helps to distribute the load and makes it clamp more securely.


Overall, I really like my wagon vise. It took a lot of fiddling to get it right, mainly because of my lack of skill or design sense, but once I figured out what I wanted to do, and how to do it, it was fairly straight forward. If I had a larger bench, I'd love to use one of the shorter shoulder vise screws used in European workbenches. It would be totally overkill, and would take up a fair amount of your bench, hence you'd need a big top for it to work, but it would be really cool.


And one more comment. When Chris Schwarz talked about his original wagon vise, he mentioned that he was concerned about all that force on just a small block at the end, so he put an end cap on his bench top. I decided to risk it, and I know it's still quite new, but so far it seems like it's doing just fine. It is about 12 square inches of face-to-face glue surface on each side, so that should be pretty strong. And it seems to be working.


Give it a shot on your own bench. Once you get the concept, it's not that difficult.

AAAndrew


Monday, October 26, 2009

Lessons learned thus far

Some random thoughts and lessons I've learned at this significant milestone in my bench building.

The first thing I've become convinced of is that the chop of the leg vise is most likely a cherry wood of some sort. I was told in an off-hand manner by the guy at the lumber yard that the off-cut I was getting for free was mahogany. Of course, he was not really paying attention, and the wood was very roughly sawn and pretty dark, so I, of course, took it as gospel. I now have a better idea of what cherry looks like and that cherry can be lighter in weight than I thought.

I have to say that I love my wagon vise. I'm so glad I went that direction. It works really well, and makes things so much easier. The leg vise, though I've not gotten a chance to really use it yet, does seem to clamp things so much tighter than my old metal face vise. It's pretty amazing.

Even though I think I've learned some lessons as I go along, sometimes it takes a while for me to REALLY learn the lesson. Here are some I think I've REALLY learned.

1. I'm never using hard maple again. At least until the next time. (it's evil for hand tools)
2. Sharp is really important (see #1)
3. Take your time with layout. Even if you only get, maybe, two hours of shop time a week, take that full two hours, if you need to, to make sure you've got the layout done right. Hot dogging it on a key component doesn't work.
4. Know when good enough, is good enough. (and when it isn't.)
5. Use plenty of glue. This isn't a contest to see how little glue you can use.
6. Titebond yellow glue WILL glue to itself. (the company told me so, and they were right!)
7. My narrow, German, scrub plane is NOT for use on the edges of narrow boards. It really is for the face of a board. (I don't care what the Schwarz says) Maybe it's the extreme camber on the blade, or wooden sole is too slippery, but when I try to use it on a narrow edge, I just end up with bloody fingers.
8. Transverse planing before lengthwise planing really does a great job for flattening large surfaces.
9. It was so very much worth the time I had to take to make sure all the boards in my bench top were facing the same way so that when I plane in one direction down the boards, they all work with no tear-out
10. The longer you can make your bench, the better. Mine is relatively mini because of limitations I thought I had in my workshop. Now that I have it all by itself, I see I probably could have made it a foot longer, and that would make a significant difference. Always make your bench longer than you think you can accommodate. You can make it work, and it's worth it.

And for acknowledgements, I'd like to thank those who helped me with the ball catches, advise and encouragement through this process. And a big thank you to Chris Schwarz for his Workbench book, without which this would be a much different, and inferior, bench.

I still am going to make a sliding deadman, and a planing stop, so I can still claim that I'm working on my bench, but for me, it's now a fully-functioning bench.

Lessons I'm still planning on learning:
1. Do I really want a shelf on the bottom? I've never had one and it's quite convenient to be able to sweep under my bench. I'm afraid, with my habits, it will become just a place to store tools that I really should return to their places.
2. Leather on the vise chop. I got some cheap "chamois" leather pieces last year thinking I'd line the chop with these. I'm still very seriously thinking of doing it. I need to lay it out and thing hard about how much of the surface I want to line with it. I have to think about repair to the leather should it get damaged, and how I'd do that.
3. Do I still want to keep using the hook bolt for my parallel guide? Time will tell.
4. How to clamp up long, narrow boards? My last bench had a skirt along the front so I could clamp the board at the bottom to the bottom of my skirt. But if the board is narrower than the thickness of my bench top, on what do I rest the board as it extends along the bench if it's too narrow to reach my deadman? Hmm.

Overall, there has been so much that I've learned in building this bench. It has been a great experience and has definitely made me a better woodworker for it. And now I have a solid, massive (even in its mini form) bench with which I can work. I'm really excited.