Showing posts with label flattening. Show all posts

Wednesday, December 2, 2009

Mini bench

When my son began to express interest again in coming into my shop and hammering on nails, or, as he did last night, working the wagon vise for me as I showed him how to chop out a half-lap joint, I decided to make him his own scaled down bench.

There were a couple of considerations:
1. It was going to be useful for only a short period of time before he outgrew it.
2. It had to stand up to hammering and nailing, most likely at some point directly into the bench so I had to be sturdy, and cheap so I wouldn't care that it got banged up
3. His woodworking needs are limited, including probably no planing at this point
4. It had to be out of materials I had on hand.

So, I settled on a bunch of 2x6 and 2x4 lumber I had sitting around my shop for years and which were bone dry at this point. It was thick enough to give some solidity, cheap enough to not worry about him trashing it at this point, and easy enough to work with.
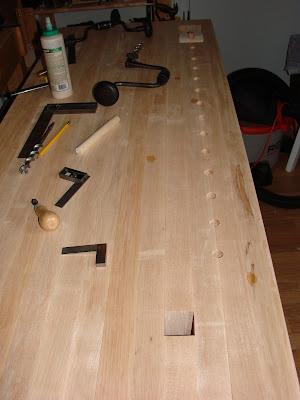
The Bench Top

I started with the top. I jointed a couple of 2x6's and glued them together.


Nothing pretty, but solid enough. The boards were also a bit wanky. That's my technical term for slightly cupped, not flat, even a little wavy in places.

I could have flattened them individually before jointing them, but since they were so small, I decided to get them glued and then tackle them together as a single surface.

I first trimmed them to length.


Then I began with my old German scrub plane.


You can see the kinds of shavings I was getting. I didn't set it to be very aggressive because this pine will splinter like anything if you try.


After that, I began the diagonal traversing. You can see what happens when you have no camber on the blade and go across grain.


The last step was to plane down the grain with my #3 to smooth out the marks from the other planes. I also ended up taking some passes with one of my #6 planes as a kind of joiner plane before my #3 but it all seemed flat enough for my purposes so didn't spend much time before jumping right to the smoother.


And here is a little display of the different kinds of shavings that result from the different operations. I dug through my shaving pile and found, from left to right:


Scrub plane chips - Early traversing short shavings - Longer shavings from traversing - Thicker shavings along the grain to take down the high spots left from traversing - Final thinner shavings from smoothing.
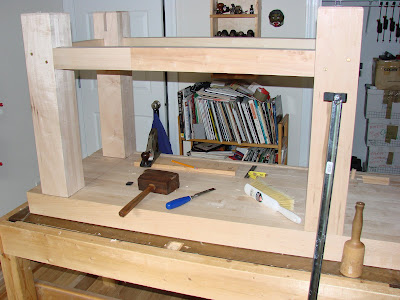
The Base

The next time I was in the shop I began the base. Here I'm going back to my supply of dry, cheap construction lumber. I think 2x4's are sufficient for the legs. I figured just half-lap joints to affix the front and back cross pieces, made out of a scrap 1x4, and some simple through M&T joints for the end cross pieces. My design at this point is to mortise and tenon the base into the top so I figured to leave some wood above the half lap for this.

I decided to put the front and back cross pieces up just under the top because I wanted to leave the bottom as open as possible for him to stand, and the size of the bench and the lack of much clamping up at the top made this possible. I figured I can always flip the legs upside down as I get them built and put the cross member at the bottom if I decide to.

This is indicative of another aspect of this project I wanted to explore: improvisation. I'm working pretty rough and pretty imprecise. I'm using the material itself for measurements so I have no idea how big any of this is. If I were to take more care with this, as I certainly will for his next bench when he's old enough to actually do stuff, the proportions would have been different, and I would have taken care to shape and size the various components to look better together. As it is, I have a feeling it will look a bit odd once it's finished, but I'm looking to spend as little time making it while still having it be functional for its limited requirements.

So, I started cutting the legs.


Using one leg to indicate the size of the next


You can see the precise layout tools I'm using reflect the obsessive drive for perfection in this piece.


Using my bench hook I first trim


Then do a quick squaring off just using my bench hook as a quick-and-dirty shooting board rather than get out my dedicated one. This is part of my drive to do this as quickly as possible.


After getting the legs cut and squared, I figured out about how far apart they were by using a scrap of 2x4 as spacer. I need the legs far enough apart so that the bench is stable, but want to leave some room on the ends so I can do through through mortise and tenons to affix the base to the top.


At this point I started to touch up the surfaces of the legs. I don't need them perfect, just better than straight-from-the-borg 2x4. I'm shooting for "flat enough".


Here's a good indication of how the board itself told me I was flat enough. This wood has been in my shop for at least six years, some of it may very well be older. It has a kind of oxidation to the outside of it that is darker than the inside wood. The two pictures below show you what one board looks like as I start to flatten it. Notice in the first picture the contrasting lighter and darker areas. The lighter areas are the high spots, and the darker are the low spots after a pass or two. Once it all looks the same, as in the second picture, I know I'm done. Good enough.


I looked for a short piece of fairly narrow stock for the end cross pieces. I found this wanky piece of very soft wood. I'm not even sure where or when I picked it up. At first I thought it might be maple, but planing it was so easy and it was so soft that I suspect it's basswood. But good enough.


And now I have my material.


Cutting the joints

Layout was simple. I used the top as indicator of how far down I needed to take the half-lap joints I was going to use to join the front and back cross pieces to the legs. I left a little material on the ends assuming I'll trim it flush to the top.


I used the cross piece itself to figure out how wide to make it.


I used the material again to determine how far into the wood to cut. At this point I decided not to go with a half-lap but to take advantage of the thicker legs and just cut the full thickness into the leg. That's one less part of a joint to cut. Quick and dirty, but functional.


I cut to the lines and then started hacking it out with my chisel and mallet. You've got to be careful because this pine will splinter past your line if you just look at it funny.


I used my old router plane to sneak down to the final depth.


You can see the bottom of the cut is still not too pretty, but it got better with subsequent joints. I learned to stop hacking with the chisel sooner and cut with the router plane longer.

Voila! A couple of half-way decent joints for quick and dirty.


I have all four of these joints cut now. Next I will actually put them together and then work on the end pieces.


Sunday, April 12, 2009

It's beginning to look a lot like a bench

I've been doing the fettling and other stuff readying the bench to be a bench.

In my haste to get the top onto the legs, I noticed that I had neglected a few small gaps that could have been better in the fit of the legs to the top. So, I flipped the bench back onto my old bench and began the fiddling. (or fettling, but there's a fine line between fettling and messing things up, so I prefer to fiddle around and do a little too little than go over the line and do too much.)


I was mainly worrying about trying to get the top to sit more closely to the shoulders of the tenons on the ends of the legs. It's not perfect, but it is better than it was, and the outside lines are better.

While I had the bench turned upside down, I took the base off again and did some final smoothing of the legs that had either been neglected, or at least short changed in my excitement to get it together. I think this is part of the phenomenon of having only a few hours each week in the shop. I am so anxious for it to look like something that I often cut some essential corners to get to a more tangible stage. Well, that was part of what last weekend was all about. I popped out the brass pins, and all but one came out quite easily and smoothly. I then smoothed down the legs and stretchers to make everything as co-planer as possible.

It worked pretty good. I was a little surprised by one piece of wood on one of the short stretchers. It was significantly different than the others. It was more splintery, was less prone to a smooth finish and overall behaved much less well than the rest of the maple. It looks like maple, and may well be maple, but it's from a cursed tree. I'm glad it's only a short stretcher.


While I had the bench top on my old bench, I thought I'd try and do some more smoothing of the top. I got out my big 'ol Knight razee joiner and went to work coming down the top with the grain to take out the scallops from transversing the top.


You can see the scallops along the top of the bench, with the smooth side closest to the photographer. This plane works quite well, and I was both pushing and pulling as I worked across the bench top. I can only imagine what it must be like to do this with an 8-foot bench.

This weekend I started to put holes into my beautiful bench top. I wanted a template of some kind, and decided to use my oh-so-awfully-used bench hook. I made myself a nice maple one from scraps and then took my old pine one and drilled the holes to match the spacing for my bench.


I tried experiments with my jennings #12 and my two Irwin #12's. One of the Irwin bits cut a much smoother hole (I'll have to check the cutters on the others later) and so I used that one. I first positioned the first hole in the chop of my wagon vise and put a brass dog in it since that hole is a little larger than 3/4". (see my earlier posting about making it with a #13). I clamped a piece of scrap under the bench to help avoid tearout. I know it won't be shown, but I've seen some amazingly spectacular tearout before and I didn't want that, even on the bottom of my bench. It worked as well.


The 10" sweep of my brace was absolutely necessary and I made sure my bit was sharp and waxed. Even so, this was hard work.


I bored out the first hole, and as I was getting to the bottom I realized that it was going to come out right into the leg. Not good. I had placed the holes in my old bench hook so that I was not able to get a hole past the leg with my current configuration. Look at the picture above and see that the left-most hole is still not completely past the leg.

I solved this by boring another hole in the bench hook. You can see it to the far right in the picture below. I then put a dog in there and through the wagon vise chop, adjusted the vise to put the hole as close to the leg as I was comfortable, and then bored away.


For each hole I would use two squares to line up the brace and bit as perpendicular as possible. After each hole I would hold up an old candle to the screw, cutters and flutes. The heat of the bit would melt a nice trail of wax down the bit. I would also usually get a nice plug of wood down by the end of the bit every time. You can see this in the picture below along with the rather course screw pitch of the bit. Despite this being so corse, it worked better in this hard maple than the fine pitched Irwin I tried. You can't always take what the old guys say for granted. Sometimes you've got to just try it and see.


I eventually worked my way down my bench. I wondered where to end the holes, and after looking at some pictures, and thinking about it a bit during a rest break, I decided to end them just shy of where my leg vise will come. If I need some holding point after this point along my bench top, I can clamp a planing stop in my leg vise. You can see some drops of sweat on the bench top. That's some honest work there. A lucky 13 3/4" holes through 4 inches of hard maple.

You can see two braces on the bench top. The other one is a smaller, 8" sweep Fray-made Spofford brace that I used a couple of times to come at the hole from the bottom when I stopped too soon, or the bit wouldn't bite anymore once it broke through. I couldn't fit the 10" sweep brace between the bottom and the front stretcher, it was too long. The 8" Fray is my favorite all-around brace anyway. I rarely need ratcheting, and it's as stable as it gets. The sweep was just too small for this big job.


You can see the Spofford chuck in the picture below. I had originally drilled the holes in my bench hook with this brace, I said it was my standard brace, but then I realized that the picture seemed to indicate that was to be boring the holes in the bench with this brace, and I switched the bit to the real brace.


For full tool disclosure I went and checked to make sure of what I used.
Big brace. No markings other than "No. 120". Wooden handle with pewter rings, two-jaw chuck.
Small brace. Marked "Fray No. 110" Don't know if this means a 10" brace. I may be underestimating my brace sizes. It is definitely smaller than the other one.
Bit is a Greenlee, Irwin-style, #12 bit.
Oh, and one square was a cheapy engineers square, the other is a great little 4" Union Tool sliding square I just bought from Bob Rozaieski over at Logan Cabinet Shoppe. It's in perfect condition and well compliments my 12" Union Tool carpenter square, but much cuter.

I've now ordered my holdfasts from Tools for Working Wood and will figure out my hold-fast holes based on the hold fasts. I tried out my cheapy cast holdfast I was using in my thinner bench. It just won't work at all in my new one. Darned, I need new holdfasts. What a tragedy.

Next time I am going to use my wagon vise and dog holes to start to make my leg vise. Once I get that done, then all I have left is to make the plane stop, put a basic oil finish on it, and I'll have a brand new bench!

It's beginning to look a lot like a bench!

AAAndrew

Monday, March 23, 2009

Let the flattening continue!

Ok, so not the most inspired title.

I got another hour in the shop yesterday morning (nice light in my workshop in the morning). I pulled out my winding sticks (nice little aluminum jobs from Lee Valley) and checked my bench. I was quite pleasantly surprised to find that except for a tiny bit of crown in the middle of the bench in one place, it's pretty darned flat and true. Or, I'm just lousy at figuring this stuff out. (always a possibility).

I began the day with the bench looking like this.


Because I use my foreplane for light jointing work, I've never really put a curve in the blade or relieved the corners enough. I think that's something on my list of things to do, next time I sharpen. You can see the places where the edges of the blade dig in on my traversing strokes. It's not a huge deal, as I'm not too worried about finish of the top, I'm more concerned with flat and true. (there's one board in particular where I keep getting tearout going crossways, but it's not really worrying me like it would if this was fine furniture I was building)

The next step was to go down the top again, still traversing, with a more finely set jointer plane. I got out one of my favorites, an old "B" (Birmingham) plane. This is such a nice plane. It's about the size of a #7 and has always done a great job.

I worked my way down the top making sure I overlapped my courses. I found that sometimes I'd get to one area and the plane would hardly bite at all. For those areas I'd either work in from the right (I was going right to left down the bench) more slowly, taking more overlapping passes, or work in from the left going backwards, and eventually I'd be taking the full-width passes I was looking for. Again, this can be a whole lot more work than you want if you don't wax the sole of the plane. I use an old candle. It works.

Here's a picture part way down. You can kind of see how much rougher the surface is below the plane than above it. There are still marks from the jointer plane to be see, but that comes next. Overall, it's a much smoother surface. (and, yes, that's the tearout I'm talking about)


The next step, and the last I was able to do yesterday, was to then start to go down the bench at an angle. I got out my foreplane again and started up at the corner and worked my way down the bench. Again, I made sure I was getting full-width cuts that overlapped. You can see that the shavings are a bit different. You can get longer, ribbon-like shavings at this point. What's interesting is that the raking light really makes the bench look much more textured than you can feel. It feels quite smooth at this point, but the light shows up the texture better.


After this I checked again with my winding sticks and things are looking quite good. Next time I'll start going down the top with my jointer to take out the ripples.

Saturday, March 21, 2009

Let the flattening begin!

So, I've got the basic shape together. It's now time to turn this table into a bench.

The first thing is to get the top flat. No matter how precisely you glue up, (at least no matter how precisely I glue up), there will always be boards slightly out of alignment, or some that are bowed and so stick up higher than ones around it. The first step is take all that down to relatively flat, and the fastest way is to plane across the boards, also called traversing. I got through traversing my bench today.

First thing was to sharpen up the blades of a couple of fore planes I have. I haven't used them in quite a while, so I made sure they were nice and sharp. I ended up choosing my recent stanley #6C with a Hock replacement blade. I like to use my #6 for this as it works like a mondo jack plane with more weight behind it, and more length. It's not quite a jointer, but more than a jack. It's all personal preference. I also like to cut dovetails with a larger tenon saw. Go figure.

I first pulled this plane out the night I got this all together and tried a few swipes across.

<

It was a chore. Now, I don't expect this to be a walk in the park, but it was harder than I thought it should be, which told me I needed to sharpen. That's what I did, and did a bunch of other blades from my long planes (fore and jointer), and my little German scrub plane at the same time.

Next time I tried it, which was this afternoon, it was a whole other story. I was able to take off huge strips of wood, including full-width shavings of cross-grain hard maple that stayed together across several boards. You can see the very specific type of shavings you get from this kind of work.


You can see my little German scrib plane in the background. I tried it out, but it's blade is so small, really meant for taking down the edges of boards, not faces, and I could get much bigger cuts, and thus faster, from my #6 plane.


Here's a closer look at the scrub plane.


And there were a LOT of cuts to be made.


Overall, very satisfying. Next step will be to check for wind with my winding sticks and look for high spots. Then I'll start to transverse again, this time with a finer-set jointer, then I'll start to go down the bench with a even-more-finely-set-jointer, taking out high spots, etc... before finishing with a smoother. I'll probably wait on the smoother until the end. I at least wanted to get the bench pretty flat before fitting the face vise, and yet want to wait on the final smoothing until I've finished everything else. Then I'll do final smooth and decide on any finishing I want to do.

Still a ways to go.

One note, though, that came about during my sharpening, was how impressed I was with the Peugeot Frers. iron in the scrub plane. It is a nice, solid chunk of iron, and that thing sharpened up beautifully, and honed to a mirror finish. You don't need a scrub iron to be that honed sharp, but I put a higher angle on it, 35-degree, and didn't mind spending a tiny bit more time to get it really shining. It's one of the nicest irons I have.

The logo


The blade with the original sharpening profile. I've tried to keep the interesting profile, but I've just sharpened it. This picture is a "before" picture.


AAAndrew