Showing posts with label mortise. Show all posts

Tuesday, March 17, 2009

Pictures of the Process, Part 4

What a way to end a weekend of intense work. Yesterday I ran over to Woodcraft and got some little pinpoint gluers. I also called Titebond (Franklin) and talked to one of their good technical service people. He told me that Titebond III, which I had used for the initial glueup, does glue to itself, so his recommendation was to use the same glue.

I spread the joint a little bit with my beater glueing chisel (a modern, plastic-handled chisel I use for nasty jobs like cleaning up dried glue), drilled a few 3/32" holes into the joint from the back of the bench top, and proceeded to use the pinpoint gluers, which are long, thin metal tips attached to a little accordion-style glue bottle, to apply LOTS more glue. I squirted as much as I could into the drill holes, and then up at the end block for the wagon vise, I just came at it from every angle and was able to get the metal tips all the way into the joint and just flood it with glue.

Here's the split. The far right board on the edge is board 1, then you have board two and then three as you move into the top. The split was between board one and two below the wagon vise, and the between three and four at the end block for the wagon vise.


Arrrgh!

In the end I glued it up and put the clamps on and let it sit for about 12 hours. (yes, I did this first thing in the morning)


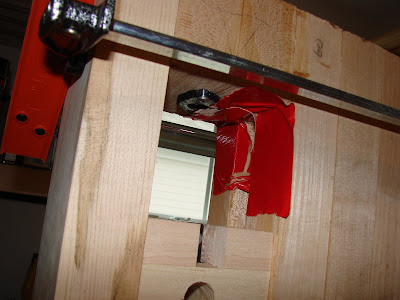
I was also very worried about glue squeeze out running into the wagon vise, so I taped over the gap with duct tape, which happens to be red, don't ask. This seems to have worked pretty good. There was squeeze out but the duct tape held it back enough that what little got through was easy enough to scrape off. My main worry was that I'd glue my vise chop into place!


Now that the crisis has been covered, let's go back and see what lead up to it. And you'll see how much work went into the top that morning, which made it all the more heartbreaking when the split happened. But I guess better now than when I went to clamp the first board in the wagon vise.

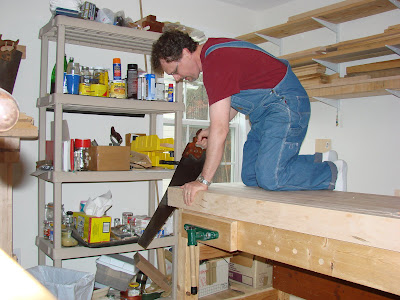
First thing I did that morning was to cut the ends off of the top. I used my c. 1917-1940 Disston D8 cut to 8tpi. It is a real trooper of a saw.


I had to get up on top of the bench to start the cut. I wanted to see the cut clearly. If I had more than one saw bench (yeah, yeah, I know) then I could have tried to haul the giant slab o' wood onto those, but this worked as well.


Starting the cut


Keeping to the line pretty well, at least from this angle.


You can see up where the cut started, just past the fourth board, and back at the corner where I cut a relieving cut so it didn't splinter out at the end, I actually cut a little out of perpendicular to the top. I'll be focusing on that when I break out my end grain planing operation.


I tried starting the cut from the floor when I did the other side and tried to keep it straighter up and down. I found the first four boards actually made this more difficult in the end. As you can see, I also flipped the bench to be able to saw this side right-handed. You can see the long slot for the sliding deadman down the front of the bench.


The next big operation was to cut the giant mortises into the top to fit the tenons on the ends of the legs. I tried all kinds of things, including a couple of big t-augers I have. I'll tell ya', that hard maple is more than a match for any of that stuff. I ended up, as I mentioned in my earlier post, drilling lots of smaller (1/2") holes around the perimeter of the mortise and then chopping out the rest of it. I did try on one mortise just boring out holes on just one end to give some relief and then chopping out the rest with my big mortise chisel. That ended up being a whole lot of work, which chips flying everywhere in the shop.


loved this little curl spit out by the bit.


Next time (ha!), I will make sure there is sufficient space between the end of the wagon vise and the mortise for the leg. As you can see the wall between the two is very thin and it blue out a little bit. I don't think it really hurts the integrity of the top, but I would have felt better with more wood between the two gaps.


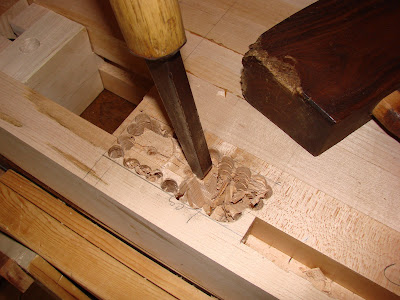
These mortises are two-inches deep, two inches wide and five inches long. That's a lot of wood to take out.


This is when I finally figured out the best way to do this, and of course it was the last one. You can see the big chunk I was able to pop out. You can also see the drip of sweat on the wood. Between sawing and these mortises, I definitely got my workout for the day!


Once I got all the mortises cut, I went to fit the base to the top. I first put a bevel on the tops of the tenons to help ease them into the mortises.


I fiddled a bit and got the tenons in pretty tightly but couldn't quite make them go in all the way. This is when I flipped the bench onto the floor. (that was an adventure!)


And it was while I was trying to pound the tenons into place that the split happened. All of which I covered above. After all that work, you can see why when the top split I just put my tools down and walked away for the rest of the night. I had put in a good 8+ hours in the shop of hard work and I was tired, discouraged, hungry, sore and ready to stop.

While the split was drying (the next day), I glued up the boards for the leg vise chop. I also was reminded why I have a love/hate relationship with my Jorgenson clamps.


I planed out a little spring into the boards, put plenty of glue on and clamped them in. Or at least I thought I had. When I went back to take it out of the clamps I discovered that I hadn't actually tightened the middle clamp or the one on the end. They felt tight because I hadn't tilted the handles correctly and just tightened away until the handle wouldn't move any more. It wasn't tightened, it was just screwed all the way back while still in loose sliding mode. It's hard to describe, but if you have clamps like these you know what I'm talking about. So, I ended up with a nice little gap right down the middle of the boards where the spring was. AAAARRRGGGHH!!

So, after doing this again (I did have spares this time!) I got it right. One of the boards is a 1/16" out of true in the middle, it's a bit bent, but that I can deal with on a 7/4 thick board.


At that point I started to make my dinner. I felt I deserved a bit of a treat for all the hard work so I made myself a Bacon Explosion. (Look it up) It's basically a woven mat of bacon, stuffed with Italian sausage with cooked bacon in the middle. It's then slow cooked and eaten in slices. It's like smokey, spicy meatloaf, and quite good. I used a Caribbean rub instead of the BBQ sauce.


After my late, but very delicious, dinner, I went back up to the shop and very carefully fitted the tenons into the mortises. I never forced anything, and ended up cleaning out one of the mortises a little more, and taking some off of the tenons where it was rubbing, etc... In other words, all the stuff I should have done the first time. This time was a little easier because I had the top down on the floor sitting on four wooden blocks so I could get my fingers underneath it to lift it when I needed to. (Good idea!!) And in the end, Voila!


Here's the underside of the wagon vise. You can see the blow out of the thin wall between the mortise and the wagon vise on the left, and the squeeze out of the glue from the re-glue of the end block on the right. Not so pretty, but damn it, it works!


I couldn't resist getting out my #6 with a Hock iron and taking some cross passes on the bench. Sweet! It is going to flatten out nicely, and will be another source of a good workout.


AAAndrew

Tuesday, February 3, 2009

Roubo Bench - part 2: The Base

In this episode, I describe how I built the base. I decided to begin with the base for a very good reason, unfortunately I can't quite remember what it was, but it was good, I assure you.

Here is the page from my Visio plans for the base.

F


I wanted to keep the leg dimensions the same, each is made of 5 4/4 boards, each 5" wide. Glued up together they make a true 5x5 leg. I laminated them allowing for the open mortise to go through the leg for the long stretchers. This saved me the trouble of cutting a 2"x3"x5" deep mortise through the leg. That was a lot of trouble saved.

As you can see from the plan, I toyed with making the long stretchers longer and then possibly putting wedged tusks through because from the beginning I wanted to make the bench so I could knock it down for moving. I ended up trying something different to the same effect.

I began by cutting all the leg parts to size.


I determined outside faces and began gluing. At this point I still hadn't learned the very basic lesson of ensuring all boards grain is going in the same direction. Fortunately, it's not as important on the legs. If there's a little tear-out, not such a huge deal.

The glue-up was a little more tricky than I anticipated. For one thing, with only short times in the shop, less than two hours a week, you really can get much glued up in that time. It also didn't help that right after I got the first leg finished I ended up having to have surgery, twice, and then radiation treatment all covering from March through June. When you can't even lift the weight of one leg, it's not so easy to make them. I managed to get some parts glued up and get some of the legs finished.

Once I got the legs put together I then finished them a bit, smoothing down some of the roughness, and beveling the bottom edges to avoid tearing out chunks as you drag it across the floor.

Next it was time to make the stretchers. I began with the short stretchers. I built them to the plan. Then I bothered measuring the wood. Oops. The boards in my drawn plan were 8/4 (2-inches) thick. The boards I ended up getting were 7/4 (1.75" thick). This kind of threw off the measurements of my top. I decided to go with 14 boards wide, thus giving me 24.5" exactly. But I had drawn my design for 12 2" boards thus yielding a 24" wide top. I had just built stretchers just .5" too short. Back to the lumber pile. This is why you buy more lumber than you need!

Because of this blunder, one of my long stretchers has two pieces butted up together to make the inside section of the laminate. (BS1 on the diagram)


It was at this point that I came up with the idea of how I was going to make this a knock-down bench. Instead of through tenons with wedges, I was still going to make them through tenons, but I was going to pin them. I thought about wooden pins that I could then drill out should I wish to move, but then had an idea.

I'm not sure where I got the idea from, whether I came up with it totally on my own or something gave me the idea but I thought about the large pins that hold door hinges together. They're about 1/4" in diameter, 4" long and have a head to give you some leverage when pulling them out. I mused on this idea all during the even slower period of intense end-of-season gardening that cuts into my already meager shop time as I help my wife get the beds ready for the winter.

I went to the Woodworking in America conference in November and absolutely loved it. While there I got to meet Chris Schwarz (and many others) and see the original bench he had built in the book. I ran the idea of the brass pins by him and others and while the reception was generally "sure, I guess you could do that, but not sure why" I got the impression it was something just not thought of before. I wasn't encouraged, nor was I discouraged. But seeing the original bench was very inspirational to get mine done!

I finished the stretchers and began to put the base together. First I began with the (new) short stretchers.


I cut my own pegs from some tough, straight-grained pine I had. I first tested it for shear strength by putting one peg into my vise and whacking it with a mallet. I have two mallets, one round carving mallet that I use for everyday whacking, and then the one you see in the photo, my "Persuader" that I bought at an antique store for $20. The store is one of those that get "antiques" by the container load from Britain. The head is about 2-pounds and very hard. It's wonderfully persuasive, and when it took some really hard whacks with the persuader to break the pin, I was satisfied.

What looks like a crack along the pins is actually just uneven glue-up. This was planed down smooth later.

The brace and bit in the picture represent the wonderful time I had cutting the 1"x3" by 2" deep mortises into the maple legs. The mortises go all the way through to the long stretcher mortise, which helped for figuring out depth, but man, that's a huge mortise to cut out. Taking down the sides to be smooth and straight proved to be a real challenge at times. At least one is not terribly straight and has a small gap where the wall is undercut at the bottom. I could wedge it, but I figured after pinning and once it's all together with the top on, the stress on that particular joint will not be such that the gap will compromise any strength.


This was a really exciting moment. For the first time, this pile of wood began to look like something. It was fun to have a leg. It was more fun to have four legs. This was now even better.

The next step was to begin and fit the huge tenons of the long stretchers into the massive mortises. I had to fare the mortises and sometimes the tenons to get them to fit. The mortises had been created by just gluing shorter pieces and I had used patterns of the tenons to help keep spacing, but it's never perfect.

Then there was the fateful day when I was ready and used my persuader and several sacrificial blocks to protect the ends of the tenons to pound these great suckers into the mortises. Getting one end together was harder than getting the other. Once I had one end on the floor with two long stretchers sticking out, I put the other end on top and saw more evidence (as if I needed it) that wood is a living material. What you couldn't see with casual inspection became obvious at this point, that one of the stretchers had a slight amount of twist to it.

This is where the mass of the whole thing comes into play. I just torqued the base around to get the tenon started, then used the mass of the end piece to help drive the whole thing down onto the tenons. It was much easier with the weight of the two legs helping me.

I now had the whole base put together.


Now that was a moment to celebrate. It is so massive and tightly put together that it is just not coming apart. The mass also overcame any issues with not quite even bottoms on some of the legs. The base does not rock or wobble even a hair's breadth. It is as solid as I could wish it.

So, despite feeling like I didn't really need them, I still wanted to experiment with the brass pins. I justified it by being concerned that racking of the base from planing might begin to work the tenons loose. When looked at dispassionately, I think the odds of that are pretty darned low considering the size of the joints, but we all have our caprices.

I obviously wanted the heads of the pins to sit below the level of the wooden leg to keep any metal off the surface of my bench, even the leg surface. I first marked out where the pins would go and drilled the countersink hole for the head of the pin with some of my wonderful center bits. I picked up a set of these some years ago and every time I use them I wonder why I don't use them more. They work so well.


You can see this picture was taken on the vise leg. The notch in the leg will be where the parallel guide will go. I cut out this notch on each individual board before glue up since cutting it in a 5" leg with a handsaw seemed to be much more fraught with peril than doing it on five 1" boards. And I want as little peril as I can get.

I then cut the ramp that will allow me access into the hole to pry up the head of the hinge pin. I had experimented with this whole setup before starting this on my bench, and I found out a couple of things. One of which was that cutting this ramp with a mortise chisel was really very easy, with a bench chisel, not quite as much. I just used the size of the mortise chisel to determine the ramp size since it was sufficient for the screwdriver I already had marked out as my prying tool.


I drilled the holes for the pin itself. I found in my experiments (I'm big on experimenting before doing anything terribly new, and that has paid off tremendously) that my Jennings bit made a hole that was too perfect and the fit was so tight that it really made it hard to get the pin out. My Irwin bit, on the other hand made a hole just perfect. There was some bite but I could also easily get the pin out.


The tenon in this picture looks worse than it is. That is not a gap you see, but actually the long stretcher is a fraction of an inch proud of the leg.

And voila, using a wooden "nail set" I drove home the pins with my persuader (overkill, but it's so much fun to use) and I have an amazingly stable and exciting (I know, I have a problem) bench base.


It was so satisfying to get to this point that I'm afraid I could easily develop "a bench problem" as Chris Schwarz talks about. And I haven't even built the top yet.

The next steps are figuring out some issues around the wagon vise and getting ready to make the top. But that's for next time.

AAAndrew