Showing posts with label tools. Show all posts

Saturday, November 14, 2009

French Frames: Part 2

I got some time yesterday in the shop and was able to put together the first prototype frame and make a couple of holders for it. I learned some drawbacks from the design and I learned some of what I need to keep in mind when designing holders.

Overall, I think this might work, but I can see that I may need longer frames. Three feet may not be long enough to hold everything since a lot of tools hang down and so you're not able to use every rail on the frame.

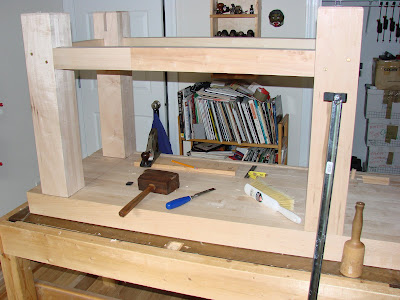
Ok, so here is what the frame looks like when it's built.


I had a small cabinet hanging on this wall over my over-stuffed book case so I took it down and hung a cleat on the wall for my testing area.

As you can see, it's nothing much to look at in southern yellow pine. God, that stuff is ugly. Anyway, here's how it looked going together.

As I wrote last time, I first made a jig to standardize the cleats going across.


I merely have to put the board in the slot, run my circular saw up against the fence, and voila! I have a cleat for the frame, and a matching cleat for a holder.


So, after I did my first board to show that the jig worked, and it works great except if the board is particularly warped, I started cranking out two-foot sections for all the cleats on the frame.


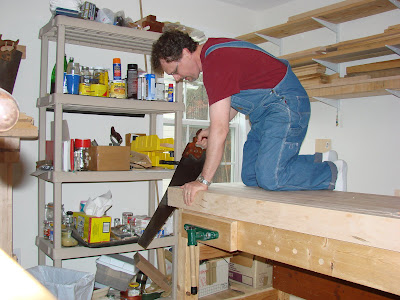
This is faster to do on my bench hook with my disston backsaw. I guess I could set up another jig on the end of my other one to cut two foot sections on my circular saw, but I just don't like the screaming machines and only use it when I absolutely have to.

So, once I got my rails together and cut them into cleats I built my second jig, the one that will help me construct the frames square and consistent. What I needed was a simple board that kept the two sides straight and parallel to each other and I wanted a quick reference to place the cleats for nailing. I used an old piece of woodstalk fiber board for the base, and a couple of 1x2 for the side rails. I ran my gauge up one side of the board to get a reference line then nailed one of the side rails in place. I then measures where I thought the other line should be and drew a line on the board. I then took my cleats and used them as a reference to double check my line, and it was right on. I then nailed the second side rail in place.


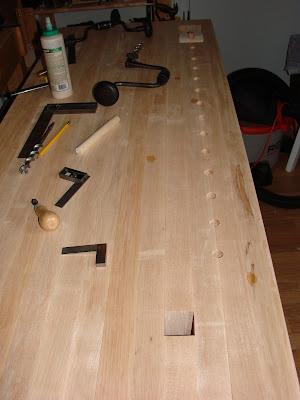
I worked out spacing for the cleats and figured that about five inches between the bottom of one cleat and the bottom of the cleat below it would give me enough clearance for whatever holders I might use. The top cleat didn't need to be down so far from the top, so it's just four inches. You can see my spacing on this next picture.


Now, my jig is only twenty-six inches long, so I start with the two side pieces of the frame pushed up against the front of the jig and line up my cleats down to the 24" mark. After I nail them in place with three 1 1/4" bright finish nails on each side, I move the frame so that it lines up at the bottom and because there are two inches left on my board at the bottom, and two inches left on my frame at the bottom, I can use the last two marks, the 19" and 24" marks as the 29" and 34" marks for the last two cleats. This may help with the explanation.


Here you see the 19" mark is also marked as 29"


I turn it over and nail on another cleat to the back that will allow the frame to hang on the wall and Bob's your uncle.


Here you can see the nails and how I put them in to try and minimize splitting.


So, the next step was to try and make some holders. I decided to try a chisel holder first, and somehow got the idea of drilled holes, with slots cut in to go back to the holes which would then hold the chisels.


A couple of problems.
1. It was a really stupid design that didn't work.
2. The wood was really brittle and kept breaking off in between the cuts
3. It was a really stupid design that didn't work.

So, I moved on to something to hold my squares. I settled on a board with slits cut in it to hold the blades of the squares. I ended up pulling out my tiny 1/8" pigsticker mortise chisel and cutting the slits. It worked pretty good, but it's very difficult to get a clean mortise in poplar at 1/8". But it was good enough.


I glued and nailed it to the mounting cleat and hung it up.


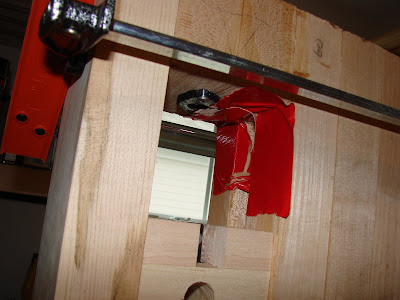
I discovered one the shortcomings of this frame design. When you have a weight hanging out away from the frame, you must stabilize it in front or else it tends to tip out of the cleat. I also realized that since there is no back to the center of the frame (remember, the cleat, being merely nailed on, stands 3/4" out from the wall) I also need to either to use only full width cleats so that it touches the side rails in back, or need to add something to give it a back or front when I make something that could tip out like this one. Later in this post I'll show you a kind of holder that doesn't tip out, even if it was short enough to fit between the sides.

To try and counter the tip-out I did a quick and dirty nail-glue some small pieces along the front of the hanging cleat to see if that helped.


It did help, but not by much. I need to have a more substantial front piece. So, I'm in the process of re-doing this holder.

Meanwhile I made another holder, this time for my chisels. I have a bunch of odd chisels and one unified set. I tried to decide if I wanted the set all by itself, or to mix it in and arrange them by all by size. Since my set is just a cheap Czech.-made set (but they're good chisels, just not terribly fancy) I decided to just add them in and keep them all by size for now.

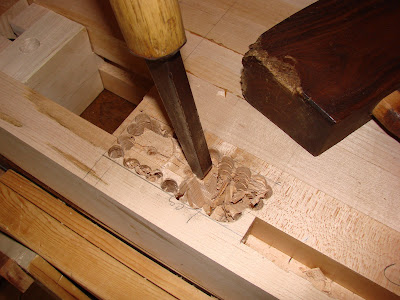
I was not going to go back to the really bad design I started before, so this time I remembered what I had originally thought for a chisel holder way back when I started thinking about this system. I took a 1x4 of "clear pine" and started cutting out grooves. The only measuring I did was to put the chisel down on the board, get it fairly straight with a small square, trace along the edges of the chisel and then cut down a ways with my back saw, then chisel out the groove. When I do this again, I'll set the depth of cut with a reference line, but I was pretty much freehanding this to see if it worked.


The wood was soft enough that I used my mallet to do a controlled cut at each end, but the middle stuff I could take out by just pushing the chisel along. These went very quickly. I only had a couple of pieces between the grooves chip out, but I just put a dab of glue on, pressed it down for a few seconds, and went on. It all got sandwiched in later and is fine.

Here's where I made another mistake. In my desire to keep my bench as clear as possible, as I cut a groove for a chisel I would put it away. The problem I encountered is that by not having all the chisels there as I cut, I ended up not taking full consideration of handle width as blades got narrower and narrower. I kept a fairly consistent distance between blades, but what i really needed to do was keep a fairly consistent distance between centers of the grooves. As the blades got narrower, the total distance between the centers of the grooves got smaller and smaller so in the end I couldn't fit two of my chisels into the holder as I had planned. Lesson learned.


After cutting the grooves, I glued on a wider piece of poplar to the front. I used a wider piece in order to hide some of the sharp edges of the chisels that were longer than the 1x4. This gives a more finished look and helps avoid any accidents as I reach for something on the frame.

You can see towards the end with the small chisels they're pretty crowded. Bummer. Otherwise, it worked out great. Since this picture was taken, I have started to use this blank space on the front. I have hung my sliding bevels on small nails, and cut a rabbet into a small piece of poplar and glued it to the front so I can put my steel rulers up there as well. Pictures on that later.


Here's how it looks hanging on the whole frame, and then with my sub-standard holder for my squares.


And here's the back of the chisel holder to show you the ends of the chisels hanging down out of the 1x4 and why I put the wider piece of poplar in front.


So, with this kind of holder, where the weight is pulling straight down, and there is a piece that is flat against the front of the cleat on the frame, it works perfectly. I can see that for other kinds of holders, such as the shelf holders I'm envisioning for my planes, I will need to makes sure the hanging cleat is enclosed in a way that keeps the whole from tipping out of the angled connection. It's a good lesson to learn now, with my crappy SYP prototype.

I'm getting the hang of just what works and what doesn't and just what goes into making a holder for these frames. The tricky parts will be making hanging boxes or other types of holder for small things I've got in boxes on shelves at the moment. But that will also be some of the fun. And right now I may end up creating a frame for a whole shelf, but in the end I may not want all of that stuff that's currently on one shelf to be together. That's where the flexibility of the system comes into play. Once I have all of the frames together, then I can move the stuff around to fit how I work.

I'm excited to start making some more holders and figure out what works and what doesn't and get this party started. I think, in the end, that if I make the frames longer, and get creative with the holders, this will be quite a fun system for holding and storing tools. It kind of reminds me of the Shaker system of pegs where they could hang coats or whole cabinets off of pegs. It's flexible, easy and cheap to make and allows me to change my mind, add tools and change around my shop. It's not as beautiful as some of the gorgeous furniture the real joiners make, but I think it will work for me and my shop.

Update: Here's a picture of the addition of a ruler holder as well as the sliding bevels hanging from the front. Not sure if I want to keep these two types of tools with my chisels, but I'm just experimenting with different kinds of holders.

Thursday, November 12, 2009

French Frames: Part 1

I mentioned in an earlier post an idea I've been toying with regarding a way to store, display and basically keep organized all of my tools. I've thought about cabinets, about shelves, etc... but I keep coming back to an idea I got from a picture in a magazine, and a commercial shelving system I've seen in several stores.

First basic concept to understand is the French cleat. A French cleat is basically a board with one long edge trimmed at an angle. (I've discovered that 30-degrees seems like a good angle that compromises strength with holding power) The board is screwed into the studs with the angle facing into the wall, so the wider face is outward, and the narrower face against the wall.

The second part of the French cleat is a mating piece that is also cut at the same angle. This is affixed to the cabinet, or shelf or whatever you're hanging from the French cleat on the wall. When you slip this angled piece down into the slot formed by the piece screwed to the studs, the hanging shelf or cabinet is held close against the wall and secure, yet able to be moved quite easily. You just lift it up and move it. This wonderful, and simple, invention is the basis for the whole design.

The basic idea is to make a frame about 24" wide by 36" tall. This frame will have a french cleat in the back and hang off of a cleat running around the perimeter of my shop wall. Each frame will also contain a set of french cleats running across the width of the frame. These will be used to hang various forms of holder and even shelves to store, display and basically keep organized my tools.

In this way, I make a series of interchangeable, flexible, hanging frames that allow me to create all kinds of various solutions for hanging my tools on the wall. And as I add more tools, or change the place where I want to store them, I can easily move the individual holders.

I like the idea of my chisels all hanging together in graduated sizes. But what if I get more chisels? What if I decide to get a new set, or get carving chisels and want to store them in the same place? If I've created a fixed cabinet, then I have to either make a new cabinet, or re-arrainge the old one. Both of which are much more labor intensive than making a new holder for the new chisels and shifting the current tools around to find room for the new hangers.

I've been thinking about this for quite a while but I've had my Roubo bench to finish. Well, now I'm mostly done, at least for this work, and so tonight I had the opportunity to get some shop time in and I began the process.

I'm going to first create a prototype out of a bunch of 1x4 southern yellow pine. It's not pretty wood, but I have a lot of it, and if I screw up this wood, it's not a big deal.

One of the keys to building this system will be standardization. If I had a table saw, I could set it up for 30-degrees, set the fence and go. I don't have a table saw. I did try cutting the boards with my rip saw. I can do it, but it's a real pain because to cut at an angle, I can't use the sawing bench very easily and get a good, consistent angle. I have to put the wood upright in my vise. Again, it's difficult to get a fairly consistent result.

What I do have is a circular saw. So, what I did tonight was to build two jigs. These are my first jigs ever. I've built appliances for hand tool work, but never a jig for power tools. One of the jigs holds the two-foot section of 1x4 and includes a fence for my circular saw. I plop a piece of wood in the jig, fire up the saw and saw right through. I still need to take a pass or two with a hand plane to make the surface nice, but this gets me consistent enough results.

The second jig I created is for construction of the frames. I took a piece of fiber board and nailed some cleats on it exactly parallel and 24 inches apart. I can then place the side stiles of the frame in this jig and it has the locations for the French cleat rails that extend across the frame marked on the side cleats to facilitate affixing them to the sides.

I cut up the wood for the first frame tonight and got it laid out. It works out quite well. My next question I will hopefully answer with this prototype is how exactly I will affix the French cleat rails to the frame. I'm thinking of a dab of glue for luck, and either nails or screws. Nails will look better, I'm thinking screws will hold better. But I could, if I wanted to go to that much effort, do a clenched nail since the frame will stand out from the wall at least the distance of the thickness of the French cleat on the wall. I think I'll have to look up clenched nails again and see if that's what I'd like to do.

Tomorrow I should be able to get this frame put together and work on making some holders. They may not be pretty to begin with, but I've got to start somewhere, and this is only a prototype. Right?

Update: After doing a little research online, I think I'm going to try and clench (aka clinch) nails to hold the cleat rails on. I'm going to have to look for some good nails that are about 1.75" long with a wide head. Nails can be incredibly strong, we usually underestimate them, and this technique supposedly can increase the holding power quite a bit. We'll see tomorrow.

Wednesday, June 24, 2009

Work Sharp Hints and Tips

I started to write this as a response to a comment but it became too long and involved, so I thought I'd throw it up here as a post by itself. This is my personal experience with my Work Sharp 3000 and how I've learned to use it best for what I do and how I work.

Hmmm. General advice on the Work Sharp...

Up until very recently I was using the Work Sharp (WS) the standard way, by putting my tool on the bed of the port underneath the wheel and moving it up and back, etc... It works pretty good with some caveats.

Small chisels, for example, were hard to keep straight. Even though fence would be tight up against the tool, because not every chisel is perfectly parallel all the way, some taper a slight bit, that means it would be tighter at the bottom of the fence then at at the top. This leads to the problem of grinding the edge at an angle, rather than 90-degrees across. Once you realize this about a particular tool, you just have to learn to compensate by figuring out which way you twist it to counteract the force of the spinning disk that wants to pull your tool off of center.

I also have a little trouble with the port because the abrasive on the base of the port is rougher than what you're using to finish the bevel. So, even if you're using 3600 or even 6000 on the bevel, the scratches on the back will be something like 220 (I think that's the grit of the abrasive).

When I got the wide blade attachment, and began to use it, I realized how much easier it was to use the whole machine like a scary sharp system that moved for me.

The wide blade attachment is an aluminum bed that attaches to the side of the top of the glass disk and makes a theoretically flat, parallel bed off of which you can use their included honing guide with the abrasive on the spinning glass disk.

The trick to the aluminum bed is to make sure for each disk you put on, that you check the level of the bed against the disk. For some reason, thickness of glass disk, thickness of abrasive paper, or whatever, different disks require me to adjust the level of the bed each time. Fortunately, that's a relatively simple and quick operation involving a small allen wrench I have hanging on the pegboard behind my bench.

The operation is a fast as, unscrew the top knob, replace or flip the wheel, screw on the knob, check level and give a quick quarter or half turn with the allen wrench if needed in one or both adjustment holes, turn it on, and sharpen. All together it takes me about 10-15 seconds to change a wheel and adjust. This is more than made up for by how fast I can sharpen a tool because I don't have to move the tool, I just have to focus on keeping it at a consistent angle.

Once I've established an edge, it takes me less than a minute to take a really dull chisel back up from 1000 to 3600 to 6000.

With plane blades, I use the honing guide. The trick with their honing guide, and perhaps using one of the other ones out there would be better, is to make sure the blade's clamped tightly so it stays consistent across wheels. If I have a lot of work to do on a blade, then I'll go all the way back to the 80 grit. Otherwise, I treat it like I do the chisels.

The Work Sharp is great for flattening the back of a plane blade. The trick to this is that you only really have to care about the top of the back, i.e. the part right up against the edge, and when you go apply the plane bade to the wheel, tilt it downwards so that the important part of the blade touches last. If you try and place the blade straight down thinking you're going to be parallel, you won't be. You're instead going to be in danger of dubbing over the back and putting a micro-bevel on the back of the blade. If that's what you're looking for, fine, but otherwise, touch the edge of the wheel first with the middle of the blade (don't worry, you won't carve a groove in it) and bring the edge of blade down last. I've had great luck getting even knarly, corroded old blades to be in great shape using this. It takes much less time than any other method I've used.

Two other accessories you'll need: Sharpies and a Magnet.

The Sharpie marker is great for knowing just when you've worked over a piece of metal and when you're not quite there. Sometimes it's nice and obvious, but for those pieces that require a lot of work, or for tricky tools, like small bevels, I'll draw lines along the surface I'm grinding with the sharpie and then when the lines are all gone, I've taken off the surface I need to and can move to the next grit. It's quick, cheap and invaluable for knowing when enough is enough.

The second accessory I've found invaluable is a magnet. The one great drawback to the WS, which is true for any dry sharpening technique, is the production of lots of iron filings. This is a messy operation. I've found that by having a large magnet around (not a massive one, but something large enough to handle a bunch of filings, but no so large it messes with the electronics in the machine) that cleanup around the top and on my bench is much easier. I'm actually keeping the filings in a small plastic container and will find some use for them later.

This brings up the topic of heat. As you're grinding metal on abrasives you will produce a fair amount of heat. You get too many iron filings around and they can actually catch on fire and create sparks. Be careful where you use your Work Sharp. Mine is in the garage away from any flammables and I'm always keeping an eye out for where the sparks go and try to keep them down to a minimum by wiping my blade on a folded paper shop towel sitting on my bench in order to take off most of the excess filings that can stick to the blade itself.

The advantage of using the designed port for sharpening is that the base of the port is made as a heat sink so that it takes away some of the heat on the blade when you draw it back across the abrasive bed. I use the aluminum base of the wide blade attachment as the same thing as I'm grinding. I keep my fingers close to the edge of the blade, and if it gets too hot for comfort, which it will do fairly quickly at the lower grits, then I'll flip it over and press the back of the blade to the aluminum bed of the attachment, and hold it down tightly using the rubbery abrasive cleaner that comes with your Work Sharp. It only takes a few seconds, generally, for the heat to dissipate enough to resume work.

And speaking of the rubber cleaner, I always run it across a disk as I change or flip it. This makes the disks last a whole lot longer and cut better. I leave the motor running and just start on the inside and draw it outwards to the edge. It works fine.

Hmmm. I'm not thinking of anything else at the moment, but if you have specific questions I'd be glad to answer them. I will say that i've not yet used the slotted wheels for under-wheel sharpening, but plan to try soon. So, I hope this has been useful.

Overall, I like the Work Sharp. It's a solid piece of machinery that I've made to work well for me. It makes the drudgery of sharpening a bit easier and I've gotten better results than other ways I've tried. Others, I'm sure, get better results with other methods, but the important thing is to work with sharp tools, regardless of how you get there.

Cheers!
AAAndrew

Oh, P.S., I have no relationship with Work Sharp, have never spoken to them except to ask customer service a question, and haven't gotten so much as a brass farthing or single sheet of abrasive from them. It's just my opinion.

Monday, June 22, 2009

Where, oh where, has the little woodworker gone?

Summer is never a good time for woodworking in the Incidental household. Spring and Summer are not the only two seasons this time of year. It's also gardening season and performance season. Mrs. Incidental teaches ballet and so requires a lot of extra time during performance season and that's when I get to watch the Galoot in Training (GIT) who, at four-years-old, is still young enough to need me nearby and paying attention, and I'm still "responsible" enough to not just stick him in front of the TV while I go off and woodwork. (thought I'm sure he'd be fine with that).

Mrs. Incidental is also an avid gardener. Here in North Carolina the growing season is very long (March to October) but there's a hole in the middle where gardening stops and it's just mainly maintenance. That's just beginning about now when it gets just too hot outside to do much more than deadhead and mow the lawn.

So, it will soon be time for me to get back into the shop. As a matter of fact, I did get some shop time this weekend, but it was all taken up with the woodworker's favorite job, sharpening.

Since that seems to be a subject of much debate, interest and religious wars, I'll briefly mention what I do to keep my tools as sharp as possible. (which we all know to be important)

I've tried various means through the few years I've been butchering wood. Scary sharp was my favorite for a while, but I got tired of changing the sandpaper and could never keep it cutting well for very long. But it did teach me to be pretty good at free-hand sharpening, at keeping a fairly consistent position with my hands. But it also seemed to take for ever if I needed to re-grind a blade, especially a plane blade, that had gotten out of square or had a nick in it etc...

I've never seriously tried water stones as I'm too cheap to get into it, and for the ones where you have to keep them soaking, I just don't do it often enough and I'm afraid of the water getting funky before I come back to the stone. I tried a couple of oil stones and a synthetic stone or two. I have an old razor hone that was new-in-box when I picked it up an an antique store that's kind of fun to use for a quick hone of a paring chisel while I'm working, but none of them seemed to find the right balance of cheap, easy, fast and effective.

In the end I decided to meet myself half-way on the cheap part and splurged for a Work Sharp 3000. These are the spinning machines with the horizontal glass plate that uses sandpaper for the abrasive. They look like they're a really cool design and they are pretty well-made, but it's taken me a while to figure out the best way for me to work with mine.

After a couple of years of sharpening on it I've found that for me, I almost never use the sliding port at the bottom that is meant to be the primary point for sharpening. Instead, I bought the wide blade attachment which gives you a wide, flat surface adjacent to the top of the spinning plate. With this and a honing guide, I can sharpen just about anything with minimal fuss and pretty darned good results.

I have a set of glass disks with various grits on them: 80, 120, 220, 400, 600, 1000, 3600 and 6000. I also have a leather disk with green rouge, but have never gotten into using that.

For plane blades I use the honing guide and the wide blade attachment. For chisels I'll use the honing guide the first time to repair a crooked or badly chipped edge. (remember, I'm fairly cheap so I'll buy good chisels in bad shape if they're cheap) Once I get a good edge on a chisel, I can sharpen the edge extremely quickly by hand. Once you have a good technique for hand sharpening, it's really easy on the Work Sharp because you don't have to move your hands, just keep them still. The disk moves for you.

To re-hone a blade, I'll usually start out at the 1000, or maybe 600 if it's seen a lot of use, and then spend a few seconds on each grit back up to 6000 which puts a mirror finish on it. Easy peasy, 30 seconds for a chisel.

The disadvantage of the Work Sharp is that it's harder to put a camber on a plane blade, but I'm working on that skill as well. It's also not as sexy as a set of exotic Japanese, high-tech, water stones. But it works for what I do.

Overall, my goal is "sharp enough" without having to get into the level where you hold the blade edgewise to a stiff breeze for the final honing. It will fall off of that level of sharpness the first moment you even look at the wood. And I've seen some amazing work down by workmen just taking a few swipes on a rock. So, I don't get all too fired up about absolute perfection with my sharpening, and the Work Sharp, which sits on my fix-it bench in the garage is good enough for me, especially as I've found the way that it works best for my skills (or lack thereof).

If anyone's interested I have a few more tips for working this way with a Work Sharp, but I don't want to turn this into a Work Sharp workshop. (say that five times fast!)

So, I will be back working on the bench in the next month or so. I have to finish up sharpening the tools I've been dulling on the maple to this point, and then I'll get another week in July to finish up the bench, so look for more activity at that point. (did I mention that my woodworking was rather incidental, and sporadic?)

Thanks for those who have noticed that I've been a bit absent these last couple of months. In the words of the immortal bard, "I'll be back." (that was Shakespeare, wasn't it? No? Well, his name started with an "S" so close enough)

AAAndrew

Sunday, April 12, 2009

It's beginning to look a lot like a bench

I've been doing the fettling and other stuff readying the bench to be a bench.

In my haste to get the top onto the legs, I noticed that I had neglected a few small gaps that could have been better in the fit of the legs to the top. So, I flipped the bench back onto my old bench and began the fiddling. (or fettling, but there's a fine line between fettling and messing things up, so I prefer to fiddle around and do a little too little than go over the line and do too much.)


I was mainly worrying about trying to get the top to sit more closely to the shoulders of the tenons on the ends of the legs. It's not perfect, but it is better than it was, and the outside lines are better.

While I had the bench turned upside down, I took the base off again and did some final smoothing of the legs that had either been neglected, or at least short changed in my excitement to get it together. I think this is part of the phenomenon of having only a few hours each week in the shop. I am so anxious for it to look like something that I often cut some essential corners to get to a more tangible stage. Well, that was part of what last weekend was all about. I popped out the brass pins, and all but one came out quite easily and smoothly. I then smoothed down the legs and stretchers to make everything as co-planer as possible.

It worked pretty good. I was a little surprised by one piece of wood on one of the short stretchers. It was significantly different than the others. It was more splintery, was less prone to a smooth finish and overall behaved much less well than the rest of the maple. It looks like maple, and may well be maple, but it's from a cursed tree. I'm glad it's only a short stretcher.


While I had the bench top on my old bench, I thought I'd try and do some more smoothing of the top. I got out my big 'ol Knight razee joiner and went to work coming down the top with the grain to take out the scallops from transversing the top.


You can see the scallops along the top of the bench, with the smooth side closest to the photographer. This plane works quite well, and I was both pushing and pulling as I worked across the bench top. I can only imagine what it must be like to do this with an 8-foot bench.

This weekend I started to put holes into my beautiful bench top. I wanted a template of some kind, and decided to use my oh-so-awfully-used bench hook. I made myself a nice maple one from scraps and then took my old pine one and drilled the holes to match the spacing for my bench.


I tried experiments with my jennings #12 and my two Irwin #12's. One of the Irwin bits cut a much smoother hole (I'll have to check the cutters on the others later) and so I used that one. I first positioned the first hole in the chop of my wagon vise and put a brass dog in it since that hole is a little larger than 3/4". (see my earlier posting about making it with a #13). I clamped a piece of scrap under the bench to help avoid tearout. I know it won't be shown, but I've seen some amazingly spectacular tearout before and I didn't want that, even on the bottom of my bench. It worked as well.


The 10" sweep of my brace was absolutely necessary and I made sure my bit was sharp and waxed. Even so, this was hard work.


I bored out the first hole, and as I was getting to the bottom I realized that it was going to come out right into the leg. Not good. I had placed the holes in my old bench hook so that I was not able to get a hole past the leg with my current configuration. Look at the picture above and see that the left-most hole is still not completely past the leg.

I solved this by boring another hole in the bench hook. You can see it to the far right in the picture below. I then put a dog in there and through the wagon vise chop, adjusted the vise to put the hole as close to the leg as I was comfortable, and then bored away.


For each hole I would use two squares to line up the brace and bit as perpendicular as possible. After each hole I would hold up an old candle to the screw, cutters and flutes. The heat of the bit would melt a nice trail of wax down the bit. I would also usually get a nice plug of wood down by the end of the bit every time. You can see this in the picture below along with the rather course screw pitch of the bit. Despite this being so corse, it worked better in this hard maple than the fine pitched Irwin I tried. You can't always take what the old guys say for granted. Sometimes you've got to just try it and see.


I eventually worked my way down my bench. I wondered where to end the holes, and after looking at some pictures, and thinking about it a bit during a rest break, I decided to end them just shy of where my leg vise will come. If I need some holding point after this point along my bench top, I can clamp a planing stop in my leg vise. You can see some drops of sweat on the bench top. That's some honest work there. A lucky 13 3/4" holes through 4 inches of hard maple.

You can see two braces on the bench top. The other one is a smaller, 8" sweep Fray-made Spofford brace that I used a couple of times to come at the hole from the bottom when I stopped too soon, or the bit wouldn't bite anymore once it broke through. I couldn't fit the 10" sweep brace between the bottom and the front stretcher, it was too long. The 8" Fray is my favorite all-around brace anyway. I rarely need ratcheting, and it's as stable as it gets. The sweep was just too small for this big job.


You can see the Spofford chuck in the picture below. I had originally drilled the holes in my bench hook with this brace, I said it was my standard brace, but then I realized that the picture seemed to indicate that was to be boring the holes in the bench with this brace, and I switched the bit to the real brace.


For full tool disclosure I went and checked to make sure of what I used.
Big brace. No markings other than "No. 120". Wooden handle with pewter rings, two-jaw chuck.
Small brace. Marked "Fray No. 110" Don't know if this means a 10" brace. I may be underestimating my brace sizes. It is definitely smaller than the other one.
Bit is a Greenlee, Irwin-style, #12 bit.
Oh, and one square was a cheapy engineers square, the other is a great little 4" Union Tool sliding square I just bought from Bob Rozaieski over at Logan Cabinet Shoppe. It's in perfect condition and well compliments my 12" Union Tool carpenter square, but much cuter.

I've now ordered my holdfasts from Tools for Working Wood and will figure out my hold-fast holes based on the hold fasts. I tried out my cheapy cast holdfast I was using in my thinner bench. It just won't work at all in my new one. Darned, I need new holdfasts. What a tragedy.

Next time I am going to use my wagon vise and dog holes to start to make my leg vise. Once I get that done, then all I have left is to make the plane stop, put a basic oil finish on it, and I'll have a brand new bench!

It's beginning to look a lot like a bench!

AAAndrew

Tuesday, March 17, 2009

Pictures of the Process, Part 4

What a way to end a weekend of intense work. Yesterday I ran over to Woodcraft and got some little pinpoint gluers. I also called Titebond (Franklin) and talked to one of their good technical service people. He told me that Titebond III, which I had used for the initial glueup, does glue to itself, so his recommendation was to use the same glue.

I spread the joint a little bit with my beater glueing chisel (a modern, plastic-handled chisel I use for nasty jobs like cleaning up dried glue), drilled a few 3/32" holes into the joint from the back of the bench top, and proceeded to use the pinpoint gluers, which are long, thin metal tips attached to a little accordion-style glue bottle, to apply LOTS more glue. I squirted as much as I could into the drill holes, and then up at the end block for the wagon vise, I just came at it from every angle and was able to get the metal tips all the way into the joint and just flood it with glue.

Here's the split. The far right board on the edge is board 1, then you have board two and then three as you move into the top. The split was between board one and two below the wagon vise, and the between three and four at the end block for the wagon vise.


Arrrgh!

In the end I glued it up and put the clamps on and let it sit for about 12 hours. (yes, I did this first thing in the morning)


I was also very worried about glue squeeze out running into the wagon vise, so I taped over the gap with duct tape, which happens to be red, don't ask. This seems to have worked pretty good. There was squeeze out but the duct tape held it back enough that what little got through was easy enough to scrape off. My main worry was that I'd glue my vise chop into place!


Now that the crisis has been covered, let's go back and see what lead up to it. And you'll see how much work went into the top that morning, which made it all the more heartbreaking when the split happened. But I guess better now than when I went to clamp the first board in the wagon vise.

First thing I did that morning was to cut the ends off of the top. I used my c. 1917-1940 Disston D8 cut to 8tpi. It is a real trooper of a saw.


I had to get up on top of the bench to start the cut. I wanted to see the cut clearly. If I had more than one saw bench (yeah, yeah, I know) then I could have tried to haul the giant slab o' wood onto those, but this worked as well.


Starting the cut


Keeping to the line pretty well, at least from this angle.


You can see up where the cut started, just past the fourth board, and back at the corner where I cut a relieving cut so it didn't splinter out at the end, I actually cut a little out of perpendicular to the top. I'll be focusing on that when I break out my end grain planing operation.


I tried starting the cut from the floor when I did the other side and tried to keep it straighter up and down. I found the first four boards actually made this more difficult in the end. As you can see, I also flipped the bench to be able to saw this side right-handed. You can see the long slot for the sliding deadman down the front of the bench.


The next big operation was to cut the giant mortises into the top to fit the tenons on the ends of the legs. I tried all kinds of things, including a couple of big t-augers I have. I'll tell ya', that hard maple is more than a match for any of that stuff. I ended up, as I mentioned in my earlier post, drilling lots of smaller (1/2") holes around the perimeter of the mortise and then chopping out the rest of it. I did try on one mortise just boring out holes on just one end to give some relief and then chopping out the rest with my big mortise chisel. That ended up being a whole lot of work, which chips flying everywhere in the shop.


loved this little curl spit out by the bit.


Next time (ha!), I will make sure there is sufficient space between the end of the wagon vise and the mortise for the leg. As you can see the wall between the two is very thin and it blue out a little bit. I don't think it really hurts the integrity of the top, but I would have felt better with more wood between the two gaps.


These mortises are two-inches deep, two inches wide and five inches long. That's a lot of wood to take out.


This is when I finally figured out the best way to do this, and of course it was the last one. You can see the big chunk I was able to pop out. You can also see the drip of sweat on the wood. Between sawing and these mortises, I definitely got my workout for the day!


Once I got all the mortises cut, I went to fit the base to the top. I first put a bevel on the tops of the tenons to help ease them into the mortises.


I fiddled a bit and got the tenons in pretty tightly but couldn't quite make them go in all the way. This is when I flipped the bench onto the floor. (that was an adventure!)


And it was while I was trying to pound the tenons into place that the split happened. All of which I covered above. After all that work, you can see why when the top split I just put my tools down and walked away for the rest of the night. I had put in a good 8+ hours in the shop of hard work and I was tired, discouraged, hungry, sore and ready to stop.

While the split was drying (the next day), I glued up the boards for the leg vise chop. I also was reminded why I have a love/hate relationship with my Jorgenson clamps.


I planed out a little spring into the boards, put plenty of glue on and clamped them in. Or at least I thought I had. When I went back to take it out of the clamps I discovered that I hadn't actually tightened the middle clamp or the one on the end. They felt tight because I hadn't tilted the handles correctly and just tightened away until the handle wouldn't move any more. It wasn't tightened, it was just screwed all the way back while still in loose sliding mode. It's hard to describe, but if you have clamps like these you know what I'm talking about. So, I ended up with a nice little gap right down the middle of the boards where the spring was. AAAARRRGGGHH!!

So, after doing this again (I did have spares this time!) I got it right. One of the boards is a 1/16" out of true in the middle, it's a bit bent, but that I can deal with on a 7/4 thick board.


At that point I started to make my dinner. I felt I deserved a bit of a treat for all the hard work so I made myself a Bacon Explosion. (Look it up) It's basically a woven mat of bacon, stuffed with Italian sausage with cooked bacon in the middle. It's then slow cooked and eaten in slices. It's like smokey, spicy meatloaf, and quite good. I used a Caribbean rub instead of the BBQ sauce.


After my late, but very delicious, dinner, I went back up to the shop and very carefully fitted the tenons into the mortises. I never forced anything, and ended up cleaning out one of the mortises a little more, and taking some off of the tenons where it was rubbing, etc... In other words, all the stuff I should have done the first time. This time was a little easier because I had the top down on the floor sitting on four wooden blocks so I could get my fingers underneath it to lift it when I needed to. (Good idea!!) And in the end, Voila!


Here's the underside of the wagon vise. You can see the blow out of the thin wall between the mortise and the wagon vise on the left, and the squeeze out of the glue from the re-glue of the end block on the right. Not so pretty, but damn it, it works!


I couldn't resist getting out my #6 with a Hock iron and taking some cross passes on the bench. Sweet! It is going to flatten out nicely, and will be another source of a good workout.


AAAndrew